Git
Tip
If you don’t want to read what follows. Here is the minimal, all commands are issued from the powershell or terminal application.
DO ONCE
Fork the SimCenterProgrammingBootcamp2020 repo in your browser.
Clone a Copy of YOUR Fork to local computer. In PowerShell (Winddows) or in terminal (MacOS), cd to a directory you want to place the repo and then type:
git clone https://github.com/YOUR_NAME/SimCenterBootcamp2020.gitChange into the local SimCenterBootcamp2020 folder
cd SimCenterBootcamp2020Create a pointer to the original SimCenter version by typing:
git remote add upstream https://github.com/NHERI-SimCenter/SimCenterBootcamp2020.gitREPEAT DAILY:
Save the changes you want to KEEP to your local repo and your forked copy (execute inside the SimCenterBootcamp2020 folder):
git add filename1 filename2 ...
git commit -m "SOME INSTRUCTIVE COMMENT"
git push
(OPTIONAL) Throw away the rest!
git reset --hardGet the latest from SimCenter repo and merge changes into your own:
git fetch upstream
git merge upstream/master -m "daily update"
Note
You can watch the lecture recordings from Thursday, August 13, 2020 on YouTube .
Git is the most widely used version control system today. Version control software is software that enables programmers to manage changes to software over time. It is great for individuals as it keeps track of every modification to the code made in a special kind of database. If a mistake is made, the individual can turn back the clock and compare earlier versions of the code to help fix the mistake. Version control software is indespensible for groups of programmers working on a shared software project for it aids programmers when the programmers are making changes to the same files (seemlessly intagrating changes from different programmers when these changes are in different parts of the files and notifying developers of ‘conflicts’ (situations when the different programmers have made changes to same parts of the same file). Version control software is an essential part of the every-day of the modern software team’s professional practices. You can use git in a number of ways:
Option A. Use with a local source code repo.
Option B. Keep both a local repo and a remote repo. A better approach if you like backups (highly recomended) or you use multiple machines.
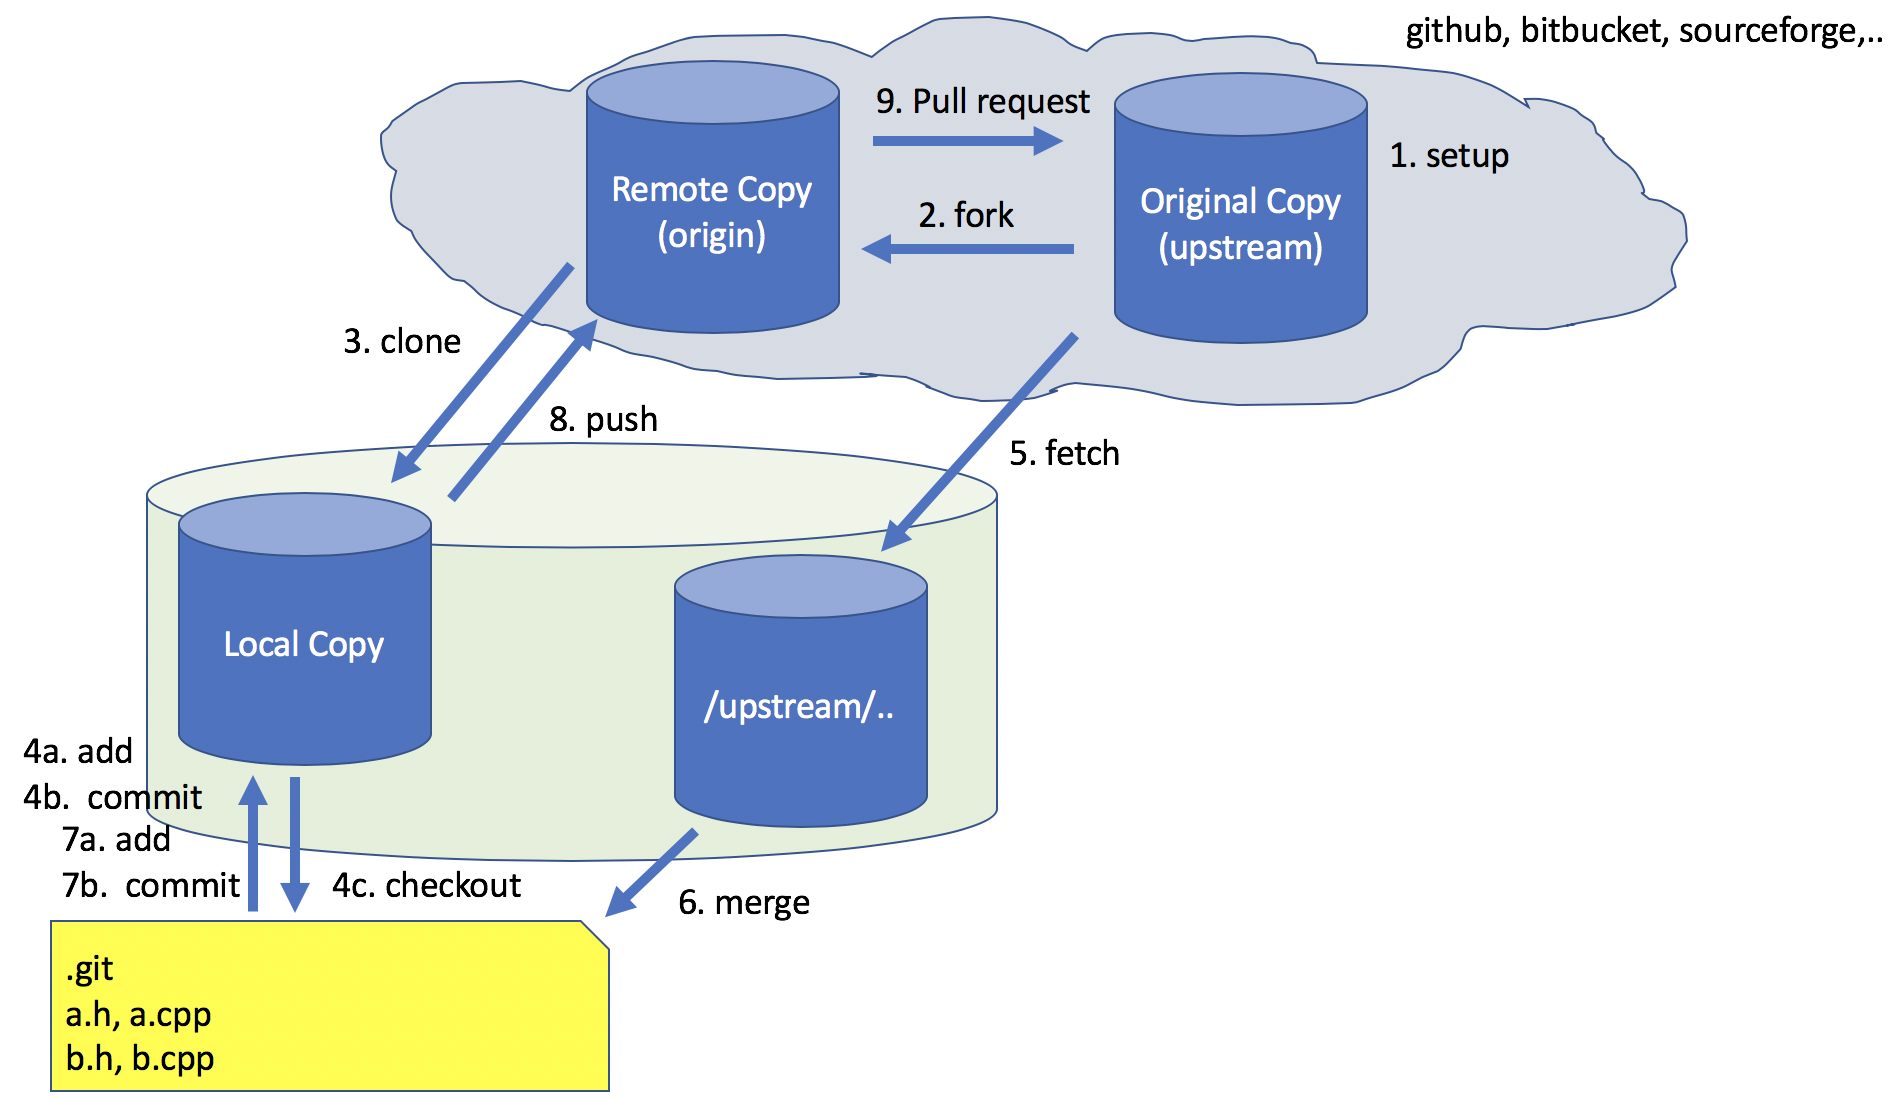
Option C. Keep both a local and a remote, but work with others on a remote shared repo.
Note
There are a number of places that will host your remote repos:
github
gitlab
bitbucket
sourceforge
Creating a Repo
For individual programmers working on a software project, the typical git eusage is to create a repo at one of the sites and point your local repo to that site. As you work with the repo you add and commit new changess to your local repo or checkout older versions of the code. At points you can send (push) your changes to github repo or pull code stored at the remote repo.
Note
For purposes of documenting the commands, we will assume the remote hosting service is github.com, your user name is YOUR_USERNAME and the repo is named REPO.git
There are three options for creating a repo.
For option A above in which you just want a local repo on your machine, in the folder in which you want to create a repo type the following in a terminal window:
git init
git add .
git commit -m "First commit"
For option B, if you have no existing code and want to start a new empty repo the best option is to go to the hosting site and create a repo there. Obtain the cloning address from the hosting site and then in a terminal window in directory you wish the repo folder to exist use the git clone command:
git clone https://github.com/YOUR_USERNAME/REPO.gitFor B again, but you have existing code in a folder and wish to create a repo go again to the hosting site and create a repo. Obtain the cloing url. Then in a terminal window go to the folder whose source code you are creating the repo for. Here type the following commands to create a local repo, add the current contents of the folder, point the repo to the hosted repo, and push the files to the remote repo:
git init
git add .
git commit -m "First commit"
git remote add origin https://github.com/YOUR_USERNAME/REPO.git
git push -u origin master
This is similar to the first option. The difference is that you point the local repo to the remote repo and then push the current files. So if you start with option A, and decide to switch to option B later you can!
On some systems, before you commit you are required to enter your login and email address with the remote service. Some other systems, will just provide a prompt when you issue the command. The commands that you may need to invoke before you can commit are the following:
git config --global user.email "email@example.com"
git config --global user.name "Mona Lisa"
Finally for option C, you are part of a collaborative project, or just want to start at the state of some other open source project you find on one of the hosting sites you first FORK a copy of the repo into your own area. You do this in the browser. Once forked, a repo will exist in your own area which you can clone. This will bring all repo files to your computer.
git clone https://github.com/YOUR_USERNAME/REPO.gitThat operation has made a local copy of the repo. If this is a collaboaritive project you need to tell the local configuration about the original repo. For command demonsstration purposes, we will again use github.com, the remote owner of the original forks repo was ORIGINAL_OWNER and the repo was named REPO.git
If you issue the command git -v you should see the url of your remote repo, i.e. typing the following in the terminal should show the results shown:
git remote -v
> origin  https://github.com/YOUR_USERNAME/REPO.git (fetch)
> origin  https://github.com/YOUR_USERNAME/REPO.git (push)
Next step is to specify the remote upstream repo and give it a reference name. The most widely used name for this repo is upstream. In same terminal window type:
git remote add upstream https://github.com/ORIGINAL_OWNER/REPO.git
Now if you type git remote -v again, you should see it as part of your remotes.
git remote -v
> origin    https://github.com/YOUR_USERNAME/REPO.git (fetch)
> origin    https://github.com/YOUR_USERNAME/REPO.git (push)
> upstream  https://github.com/ORIGINAL_OWNER/REPO.git (fetch)
> upstream  https://github.com/ORIGINAL_OWNER/REPO.git (push)
Note
if you make a mistake with the upstream repo for any reason, you can remove it and add again
git remote rm upstream
git remote add upstream https://github.com/ORIGINAL_OWNER/REPO.git
Using Your Local Repo
Once you have created the repo (whether for option A, B or C) there are some standard commands to use it. There are a number of commands add, commit and checkout are most commonly used. Others usefule commands to know are branch, rm, mv, and log.
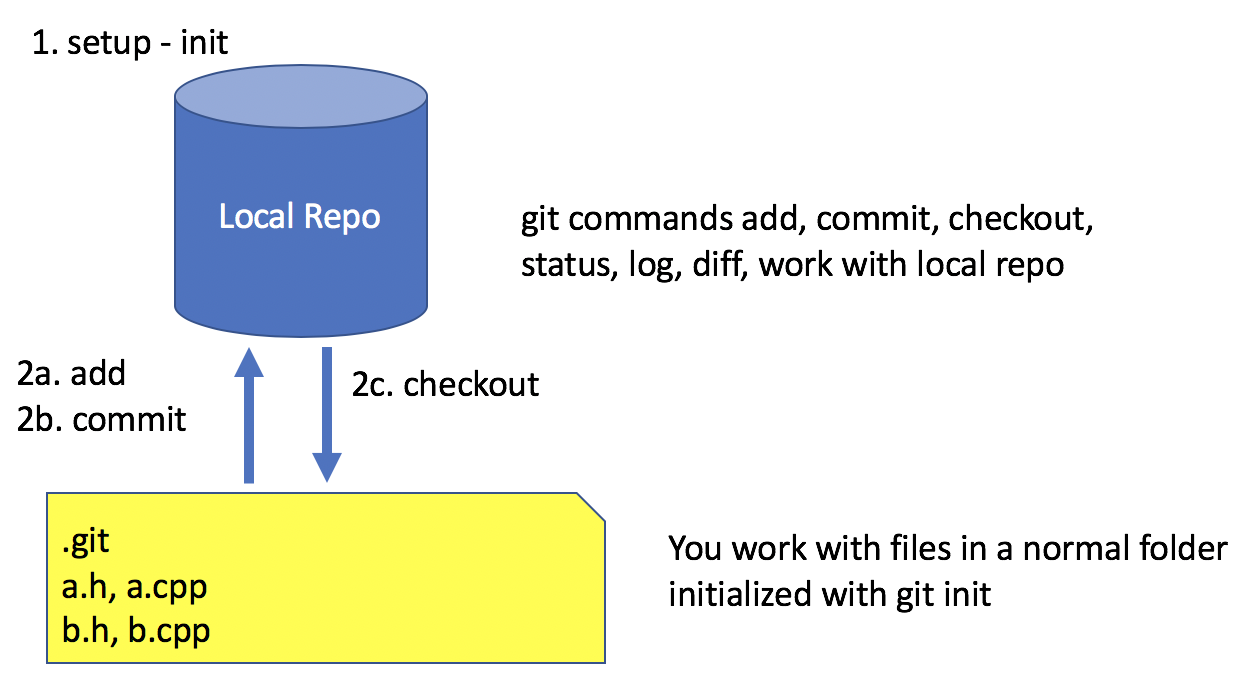
Working with Local Repo
To look at the difference between your current files and the commiitted files in the repo:
git diff
You can be selective here, you can specify the files in the current folder
git diff ./
or a list of files
git diff fileName1 fileName2 .. fileNameN
To update the repo with the current state of the files:
git add .
You can be selective here, you can specify the files in the current folder
git add ./
or a list of files
git add fileName1 fileName2 .. fileNameN
Note
The figure is not quite accurate, when you issue the add command, the files are staged for addition to the local repo.
Once added, all files that have been staged for commit, can be committed with the commit command
git commit -m "some message as to what commit is about"
To look at the commits you have made to the repo:
git log
To look at the last 10 commits you have made to the repo:
git log -n 10
If you are unhappy with changes made to a file and wish to revert back to the current file in the repo:
git checkout fileName
If you are unhappy all changes made in current directory and wish to go back to one of previous commits, find that commit’s hash and issue the following:
git checkout commitHash .
It is common to create tags to mark code milestones, e.g. versions. To create for example a version 1.0 tag issue the following:
git tag -a v1.0 -m "Version 1.0"
To view tags
git tag
Now a git push does not send tags to remote. To do so you must issue a command to do so:
git push origin --tags
To check out a tag , i.e. checkout tag v1.0 type the following:
git checkout v1.0
Note
You can also create tags and releases at the remote repo in your browser. When you create releases visitors can click on a releases tab, view the releases and download a zipped up file contating all the code for that release.
Working With Your Remote Repo
Say you have an online repo and now you want to update the repo with all the changes you have made to your local copy.
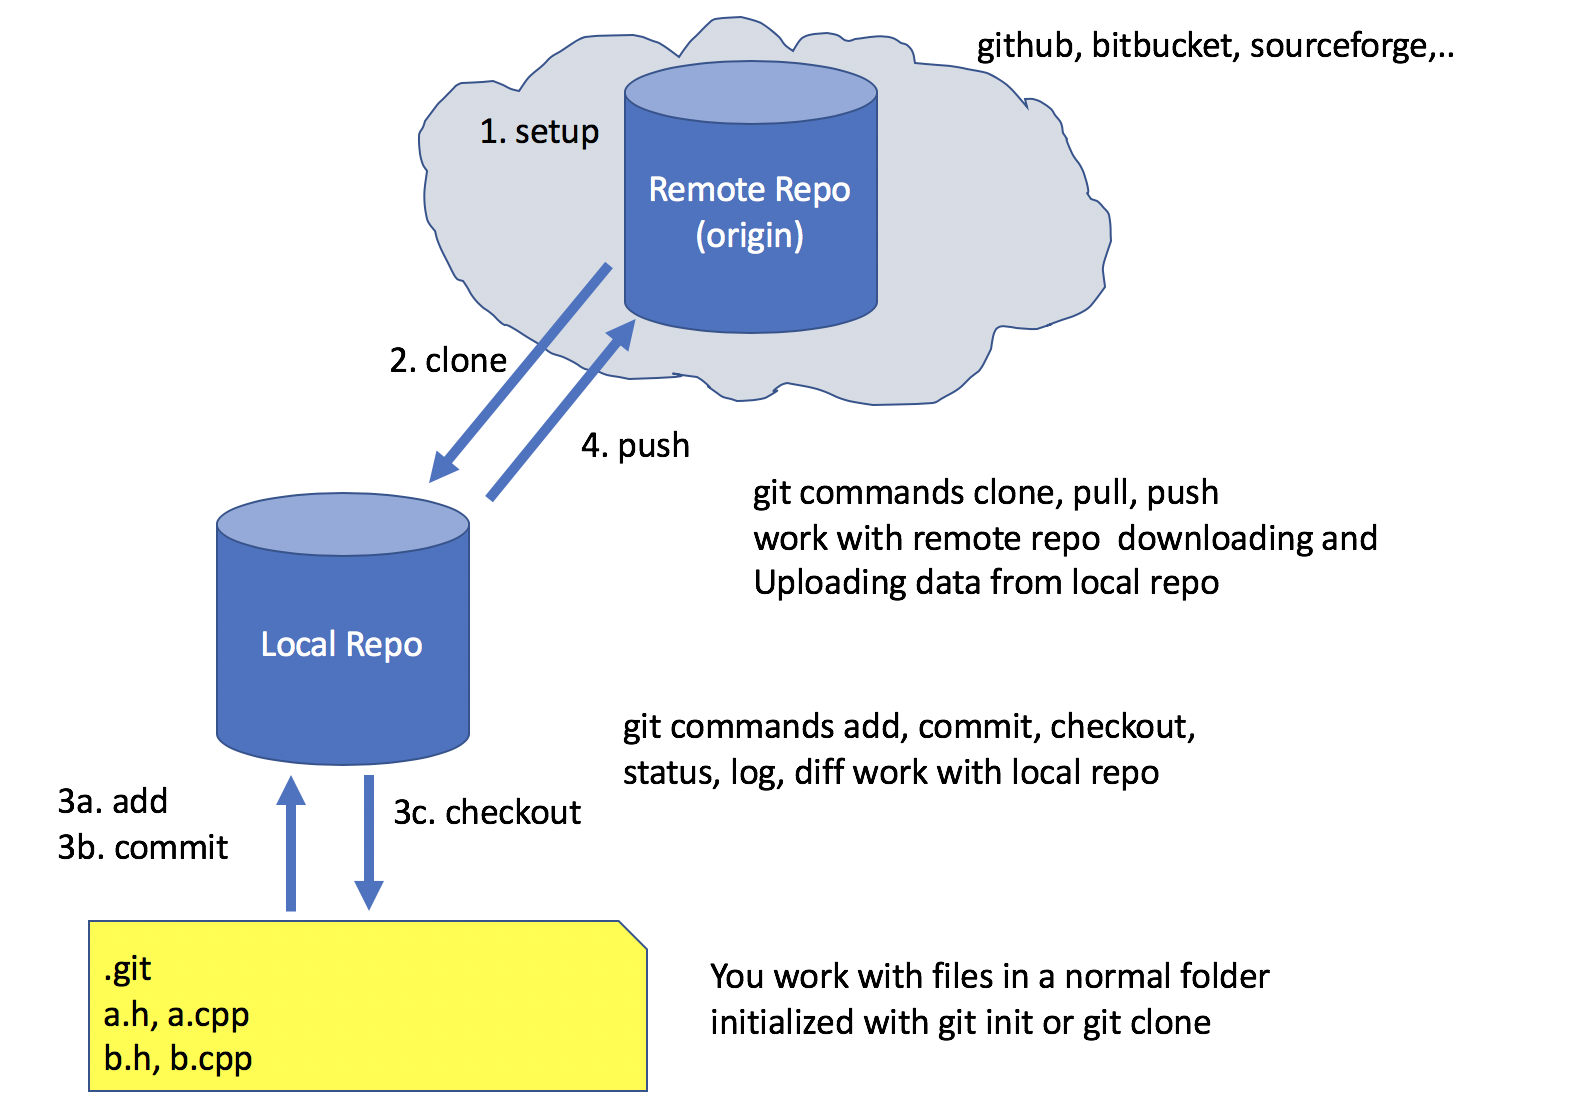
Working with a Remote Repo in the Cloud
To send the commits from your local repo to your hosted repo you issue the push command:
git push
If you want to pull the code from your online repo and merge with your current, common for situations were you are using multiple computers, you will use the pull command. It actually does a git fetch and merge in a single operation.
git pull
Synching your Fork with Original
When working in a collaborative project, your interaction with git is as shown in following figure. You fork the repo, clone the fork to your desktop, add, commit and checkout with your local repo. A good idea befor you push changes to your fork is to fetch and merge code in the original repo. This is good practice, because if you work too long away from the original chances are you will have more conflicts to sort out when you do eventually merge the code. So before you push to your own fork, fetch and merge the original repo, fix any conflicts and add and commit them. Then push to your fork. At this time you can also make a puill request to tyhe original if you think your contributions are at a significant pointy to do so.
One Recommended Approach to Collaborative Git
To Synch your Fork with the original you need to fetch the branches and their respective commits from the upstream repository. Commits to original master branch will be stored in a local branch, upstream/master.
git fetch upstream
> remote: Counting objects: XX, done.
> remote: Compressing objects: 100% (XX/XX), done.
> remote: Total YY (delta XX), reused XX (delta 9)
> Unpacking objects: 100% (YY/YY), done.
> From https://github.com/ORIGINAL_OWNER/REPO
>  * [new branch]      master     -> upstream/master
Switch to your own master branch, if you don’t use branches you will be here so this is not necessary.
git checkout master
> Switched to branch 'master'
Now merge the changes between the two into your local master branch
git merge upstream/master
>    Updating wkflkqjflkfwlkfgq
> Fast-forward
>  X files changed, Y insertions(+), Z deletions(-)
>  .....
>  .....
Note
Messages differ depending on your local commits
Now merge any conlicts with add and commit commands. Hopefully there are When dealing with conflicts you have a number of options:
You can open and edit each file that has a conflict.
You can tell git to use your version of the code to resolve the conflict.
git checkout --ours PATH/FILE
You can tell git to use THEIR (UPSTREAMS) version of the code to resolve the conflict.
git checkout --theirs PATH/FILE
Note
The latter two options, while quick and easy, are typically not what you wabt. They can be dangerous as you are loosing either your changes or changes others have made. It is thus useful to look at the conflicts individually just to ensure that you are resolving the conflict correctly.
Now that you have made the final push, you can now through, the web browser, make a pull request from your remote fork to the original upstream repo.
Warning
Not really a warning, just something to get your attention. Git has many more commands and features, e.g. branching. We have just presented enough basic commands that will get you through most of what you want to do starting off. As you come across special situations, Dr. Google will prove invaluable!