Setup Instructions
Python Days
Windows Computer
The following video demonstrates these installation instructions on a brand new Windows 10 system.
These instructions are for a Windows 10 computer. You need to install Python, ssh and git.
Note
These instructions should work for other versions of windows. However you will need to test them. In addition you will need to install a working version of ssh on your system. This is preloaded on Windows 10 machines.
Fork the SimCenter Code Repository
Go to github and sign in or sign up.
Go to the SimCenterBootcamp2022 repository.
In the very top right corner, where it has fork and a number beside it, click the fork button. This will create a fork of the Bootcamp repo in your own account.
Install Git
Install git from the git download page. Once installed, open up powershell and clone your copy of the bootcamp repo by typing the following in powershell terminal:
git clone https://github.com/YOUR-GIT-LOGIN/SimCenterBootcamp2022.git
Warning
replace YOUR-GIT-LOGIN with your github login name
Note
To start a powershell window you use the search option and type PowerShell. Start the PowerShell application when it pops up.
Install Python on Windows
If you have not yet installed Python 3.7, we recommend installing Python 3.7 from Python.org. We recommend installing using the Windowsx86 64-bit executable installer.
Note
Allow the installer to change your system environment variables so that the directory containing the executable is on your path. This requires checking the small box asking for this when the installer starts. The box is located at bottom of installer application window.
Warning
The latest version of Python is 3.8.5 At time of writing Python 3.8.5 was not working with the current numpy package.
Once Python is installed, you need to extend it by installing a number of packages. To install these packages, start a terminal window as an Admin user and in that window type the following instructions:
pip install numpy
pip install scipy
pip install matplotlib
pip install pandas
pip install openpyxl
pip install xlrd
pip install xlwt
pip install xlsxwriter
pip install selenium
pip install bs4
pip install lxml
pip install requests
pip install geopandas
pip install census
pip install us
pip install notebook
Note
This step can also be done inside the PowerShell that you had previously opened. This is demonstrated in the video.
Test the Install of Python
In powerwhell cd to the SimCenterBootcamp2022 folder and type the following.
cd code
cd jupyter
jupyter-notebook
This should open the browser running jupyter-notebook. Select any of the .ipynb files and it should open the notebook.
Known Installation Issues
Failure to install fiona package
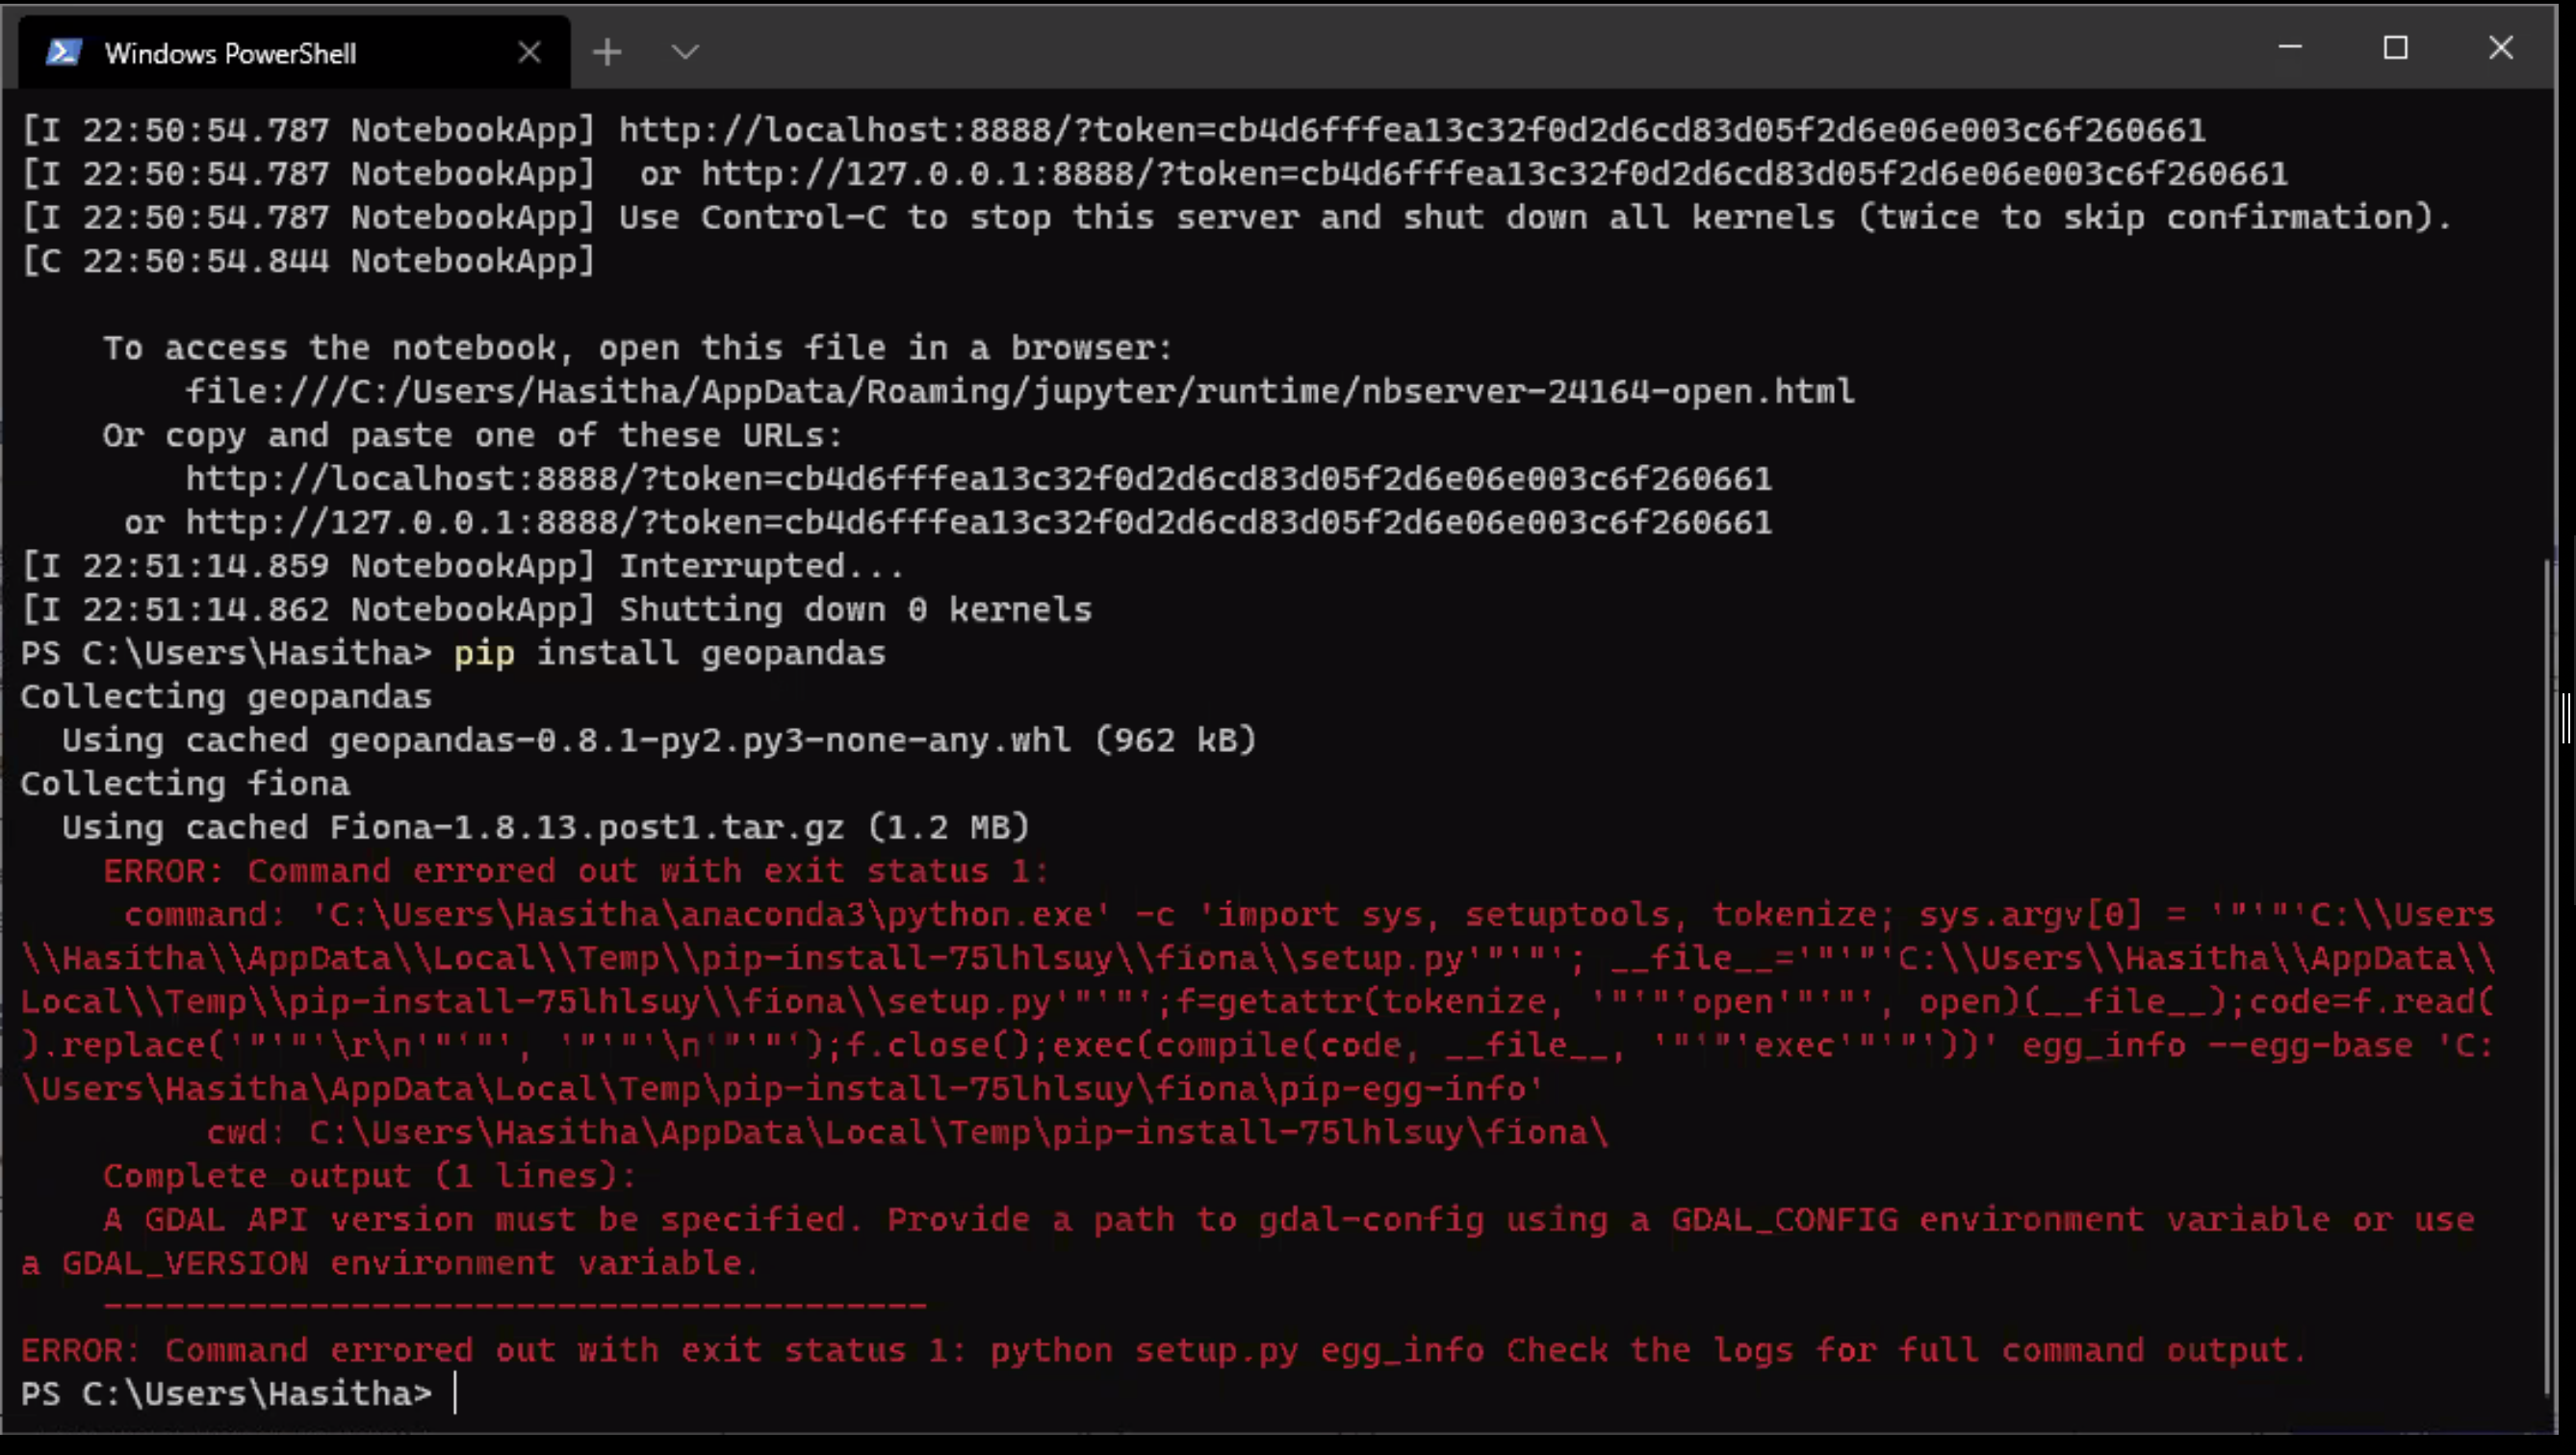
Reported installation error message
Note
It appears that the gdal package is the source of the problem. We recommend downloading the gdal and fiona packages closest to your system configuration from
Install those packages using
sudo pip install gdal*.whl fiona*.whl
Runtime error when importing numpy (or matplotlib)
The following error was reported by several students who are running Windows 10 and a brand new installation of python:
** On entry to DGEBAL parameter number  3 had an illegal value
** On entry to DGEHRD  parameter number  2 had an illegal value
** On entry to DORGHR DORGQR parameter number  2 had an illegal value
** On entry to DHSEQR parameter number  4 had an illegal value
Traceback (most recent call last):
File "<string>", line 1, in <module>
File "C:\Users\Song\AppData\Roaming\Python\Python39\site-packages\numpy\__init__.py", line 305, in <module>
_win_os_check()
File "C:\Users\Song\AppData\Roaming\Python\Python39\site-packages\numpy\__init__.py", line 302, in _win_os_check
raise RuntimeError(msg.format(__file__)) from None
RuntimeError: The current Numpy installation ('C:\\Users\\Song\\AppData\\Roaming\\Python\\Python39\\site-packages\\numpy\\__init__.py') fails to pass a sanity check due to a bug in the windows runtime. See this issue for more information: https://tinyurl.com/y3dm3h86
This error is due to a bug in the latest version of
numpy(1.19.4) on Windows 10. It can be fixed by downgrading tonumpy-1.19.3as follows:pip uninstall numpy
followed by:
pip install numpy==1.19.3
MacOS Computer
The following video demonstrates these installation instructions on a brand new MacOS Catalina system. Installation on MacOS Big Sur follows identical steps.
Fork the SimCenter Code Repository
Go to github and sign in or sign up.
Go to the SimCenterBootcamp2022 repository.
In the very top right corner, where it has fork and a number beside it, click the fork button. This will create a fork of the Bootcamp repo in your own account.
Install Git
There are a number of ways to install the source code management system **git** on your computer. The simplest is to open a terminal application and type git. If the developer package has not already installed on your system, this wil ask you to install it. So say yes. When done test it using your fork of the github repo. To do this go to YOUR fork of the github repo, using the green pull down menu, gcopy the clone address. Open a terminal and in the terminal type
git clone https://github.com/YOUR-GIT-LOGIN/SimCenterBootcamp2022.git
Warning
replace YOUR-GIT-LOGIN with your github login name
Install Python on a Mac
The Mac comes with Python pre-installed, which is currently the outdated version 2.7. As of January 1st, 2022 no new bug reports, fixes, or changes will be made to Python 2, and Python 2 is officially no longer supported. SimCenter tools require Python 3. We recommend installing Python 3.7 from Python.org Mac Download using the macOS 64-bit installer. The installer will place a python3 executable in your /usr/local/bin directory, whose location should be on your system PATH. Version 3.8 does not appear to do so anymore, see the note below.
Note
We use the python.org installation over others, due to it’s simplicity of install.
In the current installation of Python it leaves two script files in a folder when the installation ends. You need to execute both script files to get Python set up correctly so that it can be invoked from the terminal. To execute the files, double click on them. The two files, shown in the image below, are: Update Shell Profile.command.sh and Install CertificateCommand.sh.
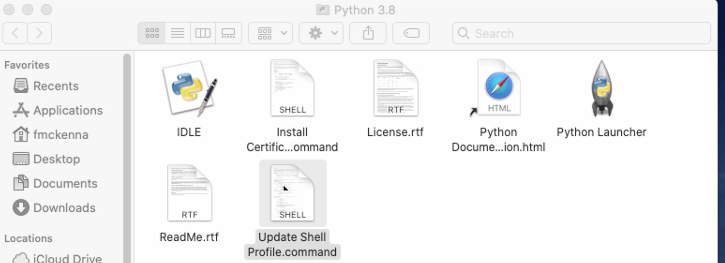
Python: Folder Displayed at Conclusion of Install
Once Python is installed, you need to extend it by installing a number of packages. To install these packages, start a terminal window and type the following:
pip3 install --user numpy
pip3 install --user scipy
pip3 install --user matplotlib
pip3 install --user pandas
pip3 install --user openpyxl
pip3 install --user xlrd
pip3 install --user xlwt
pip3 install --user xlsxwriter
pip3 install --user selenium
pip3 install --user bs4
pip3 install --user lxml
pip3 install --user requests
pip3 install --user geopandas
pip3 install --user census
pip3 install --user us
pip3 install --user notebook
Note
To start a terminal window you can use the spotlight app (magnifying glass at the top right corner of the desktop). Start the spotlight app and type in terminal. The terminal application should appear as the top hit. Click on it to start it.
The –user option was required in my install dues to permisssions I gave myself as a user. If you use the user option, you will be required to edit your PATH env later.
If you forget to invoke the UpdateShellProfile.command.sh” script at the end of the install –user, you can always edit the correct shell file later to update the **PATH variable to point to the python application.
On Linux systems, the shell is the program that takes commands from the keyboard that you enter in the terminal window and passes them to the operating system to perform by invoking applications and passing data between applications. In the good old days, it was the only interface available to the user, i.e. there was no such thing as Finder! There are a number of shell programs that can be install –usered and made available to you. The most popular is the bash shell, the up and coming one is the Z shell. Power MacOS users will write shell scripts to do many many useful things. By default the applications that the shell program will invoke are limited to applications in a few specific directories that are defined in the users PATH. Users can modify this path by editing files that the shell program will read from everytime the program is started.
When the frontend application is running the computations it is actually running a backend application using the shell program. As a consequence the shell program must be made aware of the locations of some of the external applications that you have install –usered as OpenSees and dakota do not provide install –userers that automatically do this when they are install –usered. Other applications, like Tcl provide scripts that you invoke to do it. In short you have to edit the file appropriate to the shell you are using.
To find which shell prgram you are using when you issue commands inside the terminal window, type the following in a terminal window:
env | grep SHELL
If the results is /bin/bash you will need to edit the .bashrc file or the bash_profile file. If the results is /bin/zsh you will need to edit the .zshrc or .zprofile. Typically the .bash_profile or the .zprofile file is the one to edit as these typically by design will invoke the .bashrc or .zshrc file. If in doubt, look for these files in your home directory and see which of these other installlers have modified.
Test the Install of Python
In a terminal cd to the SimCenterBootcamp2022 folder and type the following.
cd code
cd jupyter
jupyter-notebook
This should open the browser running jupyter-notebook. Select any of the .ipynb files and it should open the notebook.
Note
If it cannot find the jupyter-notebook application, you will need to edit your env PATH variable. This is done by editing the .bashrc or .zprofile file mentioned above. See the video for a demonstartion.
Known Installation Issues
“no CRS class” when import geopandas
Note
Not a question, but knowledge-sharing: The issue of importing geopandas with the error of “no CRS class” in MacOS, the solution is to install the pyproj version 2.# since CRS is introduced version 2 in Pyproj. Do the following pip install pyproj==2.6.1
C/C++ Days
Note
For the C/C++ days you will be using the you will be using the **Frontera** system and they provide a comprehinsive set of usage notes . ThYou will be using the system to:
Using git on a daily basis to update the code base.
Using ssh to login to Frontera from your terminal.
Using Linux commands once logged in as Frontera is a Linux system.
Compiling C code and running the compiled application on Frontera.
The above video demonstrates the 17 instruction steps that follow you will need to perform. For those of you who have a DesignSafe account, steps 1 and 2 may not be required:
In your browser you need to sign up for github. If you have difficulties they have a page devoted to signing up
After signing up and logging in, navigate in your browser to the SimCenterBottcamp2022 git page. At the website, click on the Fork, button at top right. This will create a fork of the repo under your own github username and take you to the main page for that repo.
Now under the Code pull down menu on this new page, copy the https address into your clipboard.
Pair for multi-factor authorization with your phone. Instructions can be found at the TACC website
Now we login to TACC. From Powershell terminal if on Windows10 or a terminal window if using MacOS, enter the following (replacing of course your DesignSafe account name with YOUR_NAME) and provide your designsafe login and the TACC token. For the TACC token open the TACC Token app you have installed on your phone.
ssh YOUR_NAME@frontera.tacc.utexas.edu
Now let us clone the repo that you just forked on github. To do so type the following:
git clone https://github.com/YOUR GIT LOGIN/SimCenterBootcamp2022.git
This last command has created a new folder in your current directory named SimCenterBootcamp2022. We now want you to cd (change directory) into that directory. This is done by you typing the following:
cd SimCenterBootcamp2022
Now we want you to issue the following command, which will add a pointer, called upstream, to the master SimCenterBootcamp2022 repo that you forked:
git remote add upstream https://github.com/NHERI-SimCenter/SimCenterBootcamp2022.git
Now let us go back to your home folder. Here we will create a new folder named hello and get you to create your first C program in that folder.
cd ~
mkdir hello
cd hello
emacs hello.c
The last command you issues, emacs starts one of the few editors available to you on Frontera and opens up a file named hello.c. We now want you to place in that file the following:
#include <stdio.h>
int main(int argc, char **argv) {
   printf("Hello World\n");
}
To save the file enter the following
<Control> x <Control> s
To quit emacs, enter now the following:
<Control> x <Control> c
Now we want you to compile the file to create an application called a.out. To do this type the following
icc hello.c
To test the code and be responsible users while doing so, we want you to start an interactive session on a compute node. To do this type the following:
idevOnce the session has started, you can run the application by typing the following:
./a.out
Application should run and output “Hello World” to the screen. You are done and have succesfully compiled and run your first C program. To now exit the interactive environment type the following:
exitFinally to log off Frontera you need to type one more exit in the terminal:
exit
Warning
Your TACC login name is the same as your DesignSafe login. If you do not have one yet, you need to obtain one from their website.
If you cannot log into Frontera, send us an email with your designsafe login as we have not added your login name to our allocation.
If you have problems compiling the code, try and use the compiler messages to see what you did wrong.