1. How to Build
SimCenter tools consist of a frontend user interface (UI) and backend applications. They are maintained in separate GitHub repositories and are also built separately. The following sections outline (1) the applications needed to build and run, (2) instructions for building the backend applications, (3) instructions for building the frontend UI, and (4) operations to perform in the running UI to link the UI with the backend.
Note
As part of our continuous integration process, WE-UQ app is built every time we check code into the NHERI-SimCenter repositories. To do this, we use a CI service. The current service is AppVeyor. Consequently, in the WE-UQ app repo that you will clone as part of this build process, there is a file appveyor.yml. This file contains shell commands that are issued to set up the operating system, download the software, and build it. If the following commands fail for you, look at the appveyor.yml file to see what commands are currently being called, as these may be more up-to-date than what is presented below.
1.1. Install Dependencies
First, ensure the following dependencies are installed:
C++17 compliant compiler: Many of the workflow applications included use C++17 features; consequently, they may need a newer C++17 compliant compiler. For Windows users, MSVC in Visual Studio 2019 (Community Edition) can be used. Some extensions of Visual Studio are also needed: Open Visual Studio Installer, go to Installed / More / Modify, under the Workloads tab, check Desktop development with C++ and Visual Studio extension development; under the Individual components tab, check C++ CMake tools for Windows. Then click Modify.
OpenSees: The workflow applications require an installation of OpenSees to carry out a structural analysis using the finite element method.
DAKOTA: The workflow applications require an installation of DAKOTA to handle and propagate the uncertainties defined in the input files for the workflow applications.
Python: The workflow requires at least Python 3.7.
Conan: This repository uses Conan, a Python library, for dependency management. Install conan version 1.60.2, for example, through
pip install conan==1.60.2See the instructions if alternative installation methods are neededCMake: This repository uses CMake for managing the build process. Version 3.15 or later is recommended.
Qt: Qt is free for open source developers. Version 5.15 or later is required. Make sure to include Qt Creator in the installer.
Warning
Qt Version 6.0 is currently available. It is so new we do not use it.
1.2. Build the Backend Applications
Instructions to build the backend workflow applications on your local desktop depend on your operating system. This is a 2-step process involving some initial setup and finally the build.
1.2.1. Setup the development environment with Conan
Add Conan SimCenter to the Conan remotes. You can add these remotes by typing the following commands in the terminal:
conan remote add simcenter https://nherisimcenter.jfrog.io/artifactory/api/conan/simcenterCreate a default Conan profile if this is the first time you use Conan for building packages.
conan profile new default --detectCheck the default profile of your build environment using:
conan profile show defaultIf the compiler name and compiler version are not listed, you will need to select a specific compiler. For instance, on Windows using Visual Studio 2019, you can specify the compiler as follows:
conan profile update settings.compiler="Visual Studio" default
conan profile update settings.compiler.version="16" default
1.2.2. Build the applications
Obtain the code in the SimCenterBackendApplications repository from GitHub. You can do that by using your preferred Git client/GUI or by using the
git clonecommand in the terminal:git clone https://github.com/NHERI-SimCenter/SimCenterBackendApplicationsTo build the applications, you need to navigate to the SimCenterBackendApplications folder that was created with the git clone command. Once there, issue the following set of commands to create a build folder, change directory to that folder, install needed software using Conan, and finally use CMake to build and install the applications. The following are the set of commands to type in the terminal (see notes below the code block if the commands fail).
On Windows, it is necessary to specify a compiler for CMake. To do this, you need to add additional arguments to line 4. That means,
for those developers using the Windows operating system, in a terminal or PowerShell window you need to type the following:
mkdir build
cd build
conan install .. --build missing
cmake .. -G "Visual Studio 16 2019"
cmake --build . --config Release
cmake --install .
cd ..
Developer using other machines should type the following command:
mkdir build
cd build
conan install .. --build missing
cmake ..
cmake --build . --config Release
cmake --install .
cd ..
Note
For Mac users running Big Sur and version 12 of XCode, there are some reported issues. Replace line 3 above with the following two lines:
conan install .. --build missing --build=libcurl
mv ./missing/* ./
For Mac users, add the following command after cmake –install . to ensure the binary applications are copied to the applications folder.
make install .
If building and installation were successful, you should find a folder called applications in the repository with all the applications inside of it. The name of this folder should not be changed.
1.3. Build the User Interface
To build the interface, you first need to download the repo and a companion repo (SimCenterCommon) from GitHub using our GitHub repos. In a folder in which you wish to build the application, issue the following two commands.
git clone https://github.com/NHERI-SimCenter/SimCenterCommon.git
git clone https://github.com/NHERI-SimCenter/WE-UQ.git
Note
Use the above links if you just want to download and build the applications. If you intend to make changes to any of the code in the repos, you should fork that repo and then clone your forked repo. Forking a repo at GitHub is done through your browser as shown on the following GitHub guides page <https://guides.github.com/activities/forking/>.
You now have two ways to build the application: (1) using the Qt Creator desktop application provided by Qt and (2) from the terminal application.
1.3.1. Build using Qt Creator
Start Qt Creator, then open the WE-UQ.pro file located in the WE-UQ directory that was downloaded in the previous step.
Set up the development kit in Qt Creator. This is usually done by selecting the Qt version, compiler, and configuration and following the onscreen dialog.
Build the application and run it in the Qt Creator IDE using the Run button. This can be done using the keyboard shortcut
F5to build and start the tool.
1.3.2. Build from the Terminal
The operations are similar to what was done when building the backend applications. In the terminal application, starting inside the directory of the cloned application again, you will create a build directory, cd into that build directory, run qmake, and finally make (or on Windows, nmake) to create the application.
Windows developers will type the following in a terminal or a PowerShell window:
mkdir build
cd build
conan install .. --build missing
qmake ../WE-UQ.pro
nmake
Linux or Mac users will type the following in a terminal window from inside the WE-UQ app directory:
mkdir build
cd build
conan install .. --build missing
qmake ../WE-UQ.pro
make
Note
qmake is an application installed with Qt. To be able to run the command as known, the path to the Qt bin folder needs to be added to your PATH environment variable. Alternatively, you need to specify the full path to qmake, i.e., on my desktop (if I had not set my PATH variable), I would replace line 3 with the following:
/Users/fmckenna/Qt/5.15.2/clang_64/bin/qmake ../WE-UQ.pro
On Windows 10 and later with Visual Studio, the above commands need to be performed using a Visual Studio x64 command prompt.
If installed, jom can also be used to build in parallel.
Once built, you can now run the tool executable.
Note
On Windows machines, you need to copy essential QGIS DLLs. To do so, run make.bat in R2DTool root directory or manually copy and past them in ./ build directory. Otehrwise, after runing R2D.exe file in ./build directory, you will receive missing DLL errors.
1.4. Modify the User Interface Preferences
Once built, the tool Preferences needs to be modified. To do this, open the WE-UQ tool, then click on File -> Preferences in the main menu if on Windows or WE-UQ -> Preferences if on a Mac. This will bring up a dialog window shown below. You need to modify specific values:
Python: provide the full path to the Python interpreter.
OpenSees: provide the full path to the OpenSees executable.
Dakota: provide the full path to the Dakota executable.
Custom Local Application: Here, select the checkbox to the left, and then provide the path to the SimCenterBackendApplications directory. The code assumes that the folder applications, which you created when building the backend applications, exists.
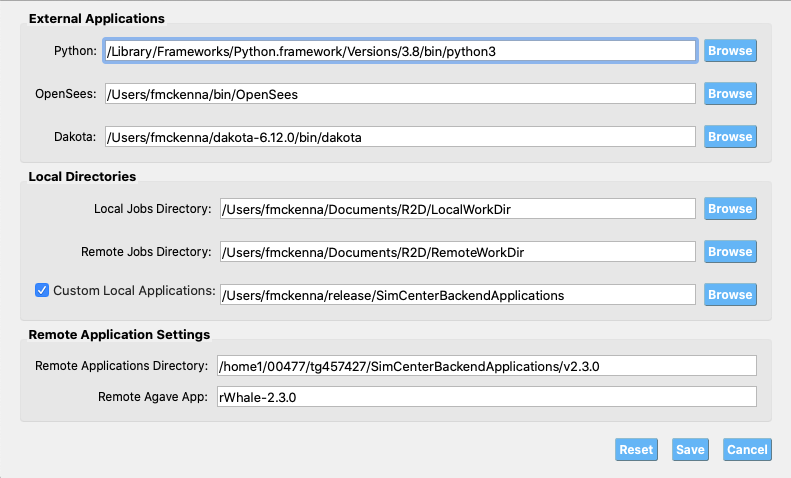
Fig. 1.4.1 Preferences Dialog