2.5.2. Run Remotely on DesignSafe
2.5.2.1. Prepare Input Files
Prepare the input files in a folder named
input_data, then zip the folder. You may use this example input file set (input_data_eq.zip) as a template.Prepare workflow settings in the configuration file. You may use the example configuration file (
rWHALE_config_remote.json) as a template.Set
'runDir'to/tmp/rWhale/.Set
'localAppDir'to/tmp/rWhale/.Specify applications for each workflow step and their inputs. For more details on the format of the configuration file, see Inputs.
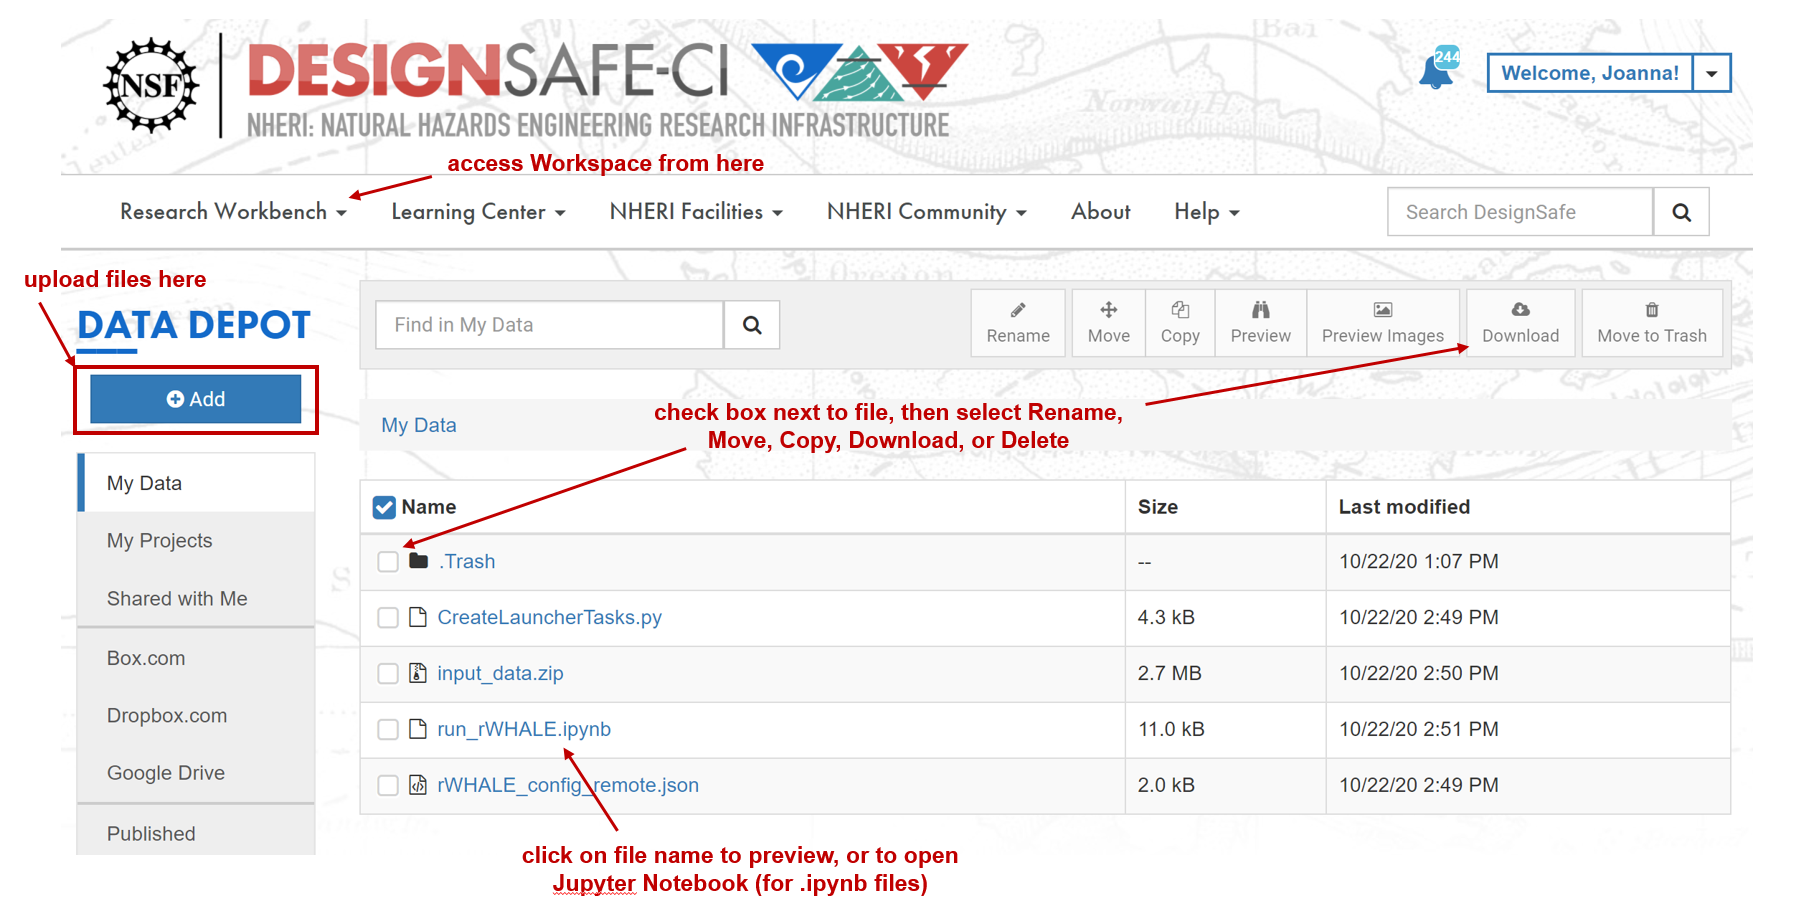
Upload the zipped
input_datafile and configuration file to “My Data” on the DesignSafe Data Depot.Upload the
CreateLauncherTasks scriptand a Jupyter notebook with commands for setting up the job on Tapis. You can use this example Jupyter Notebook (run_rWHALE.ipynb) as a template.
On DesignSafe, the files should appear in the Data Depot as:
2.5.2.2. Run Job Through Jupyter
This method uses a Jupyter Notebook to run the job, accessing the Tapis CLI in the background.
Click on the
run_rWHALE.ipynbnotebook, then click Open in Jupyter. You will be redirected to a new page for editing the Jupyter Notebook.
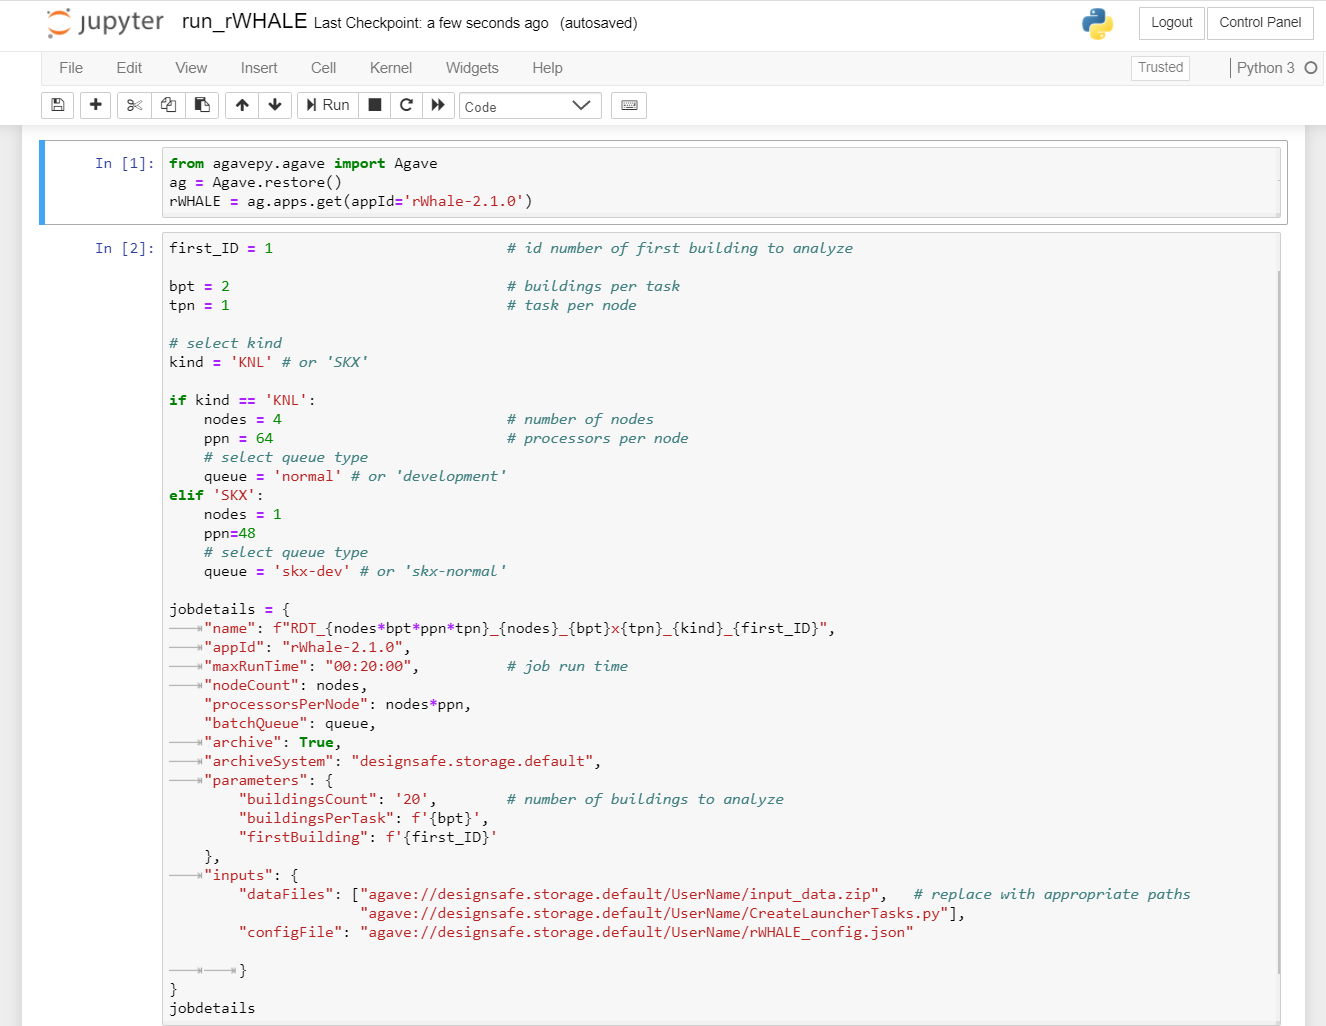
Specify settings for running the job on Frontera. Submit the job by executing all cells in the Jupyter Notebook (Cell > Run All).
To view the status of the job, navigate to the Workspace on DesignSafe. The sidebar will list all jobs that have been submitted, from newest to oldest. Job outputs can be accessed by clicking on “More Info” for the job.
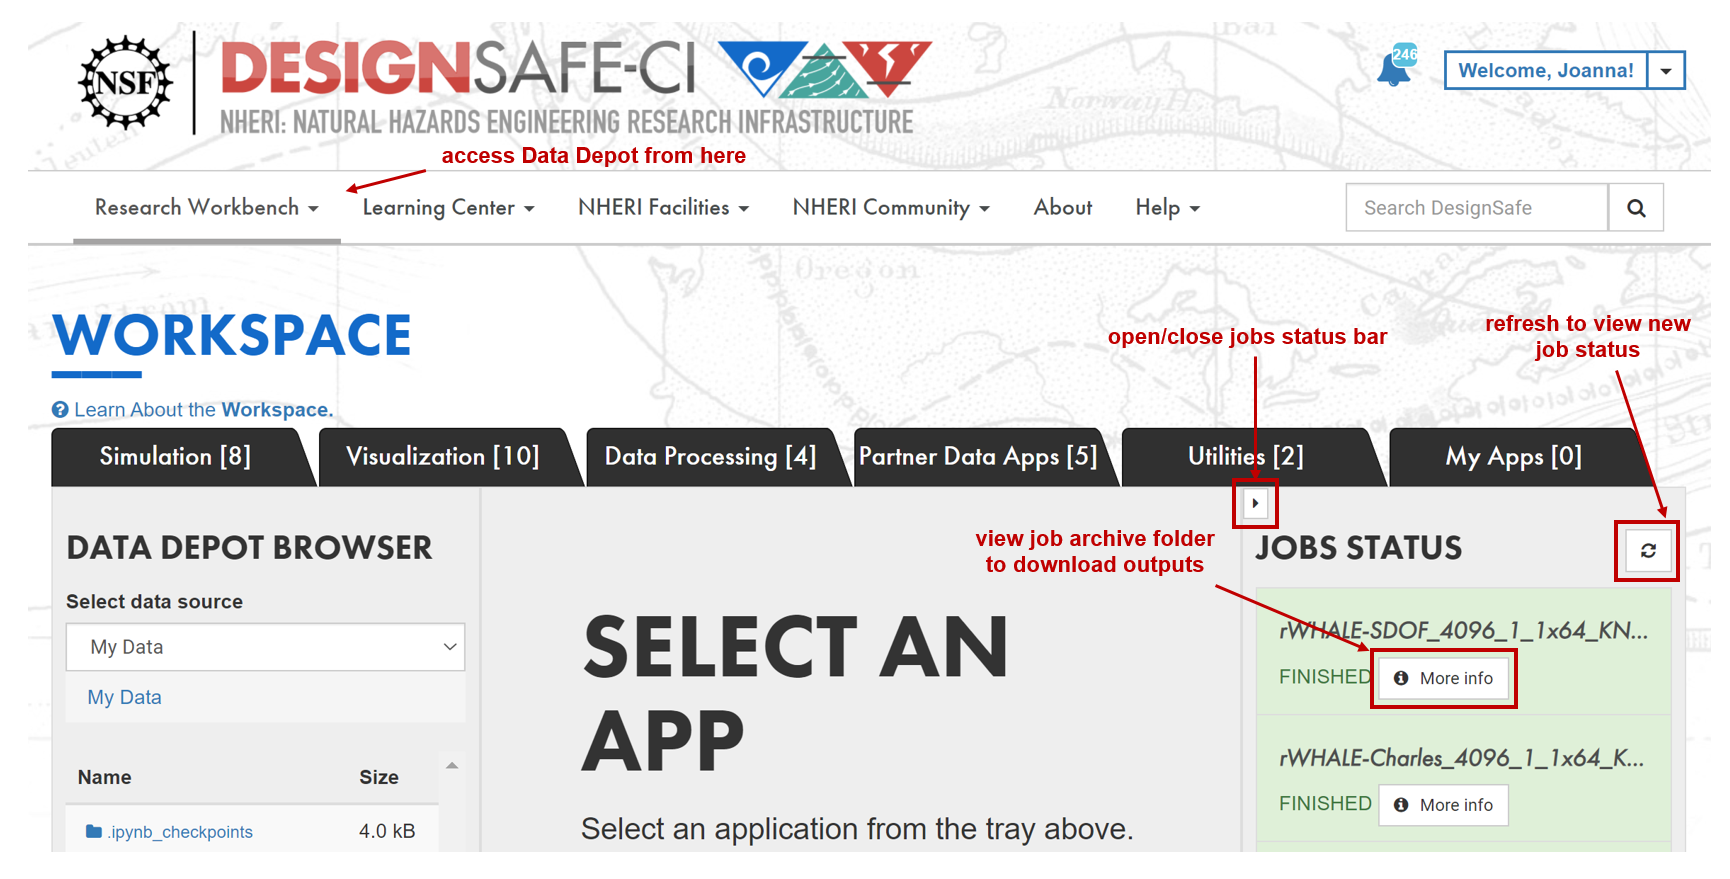
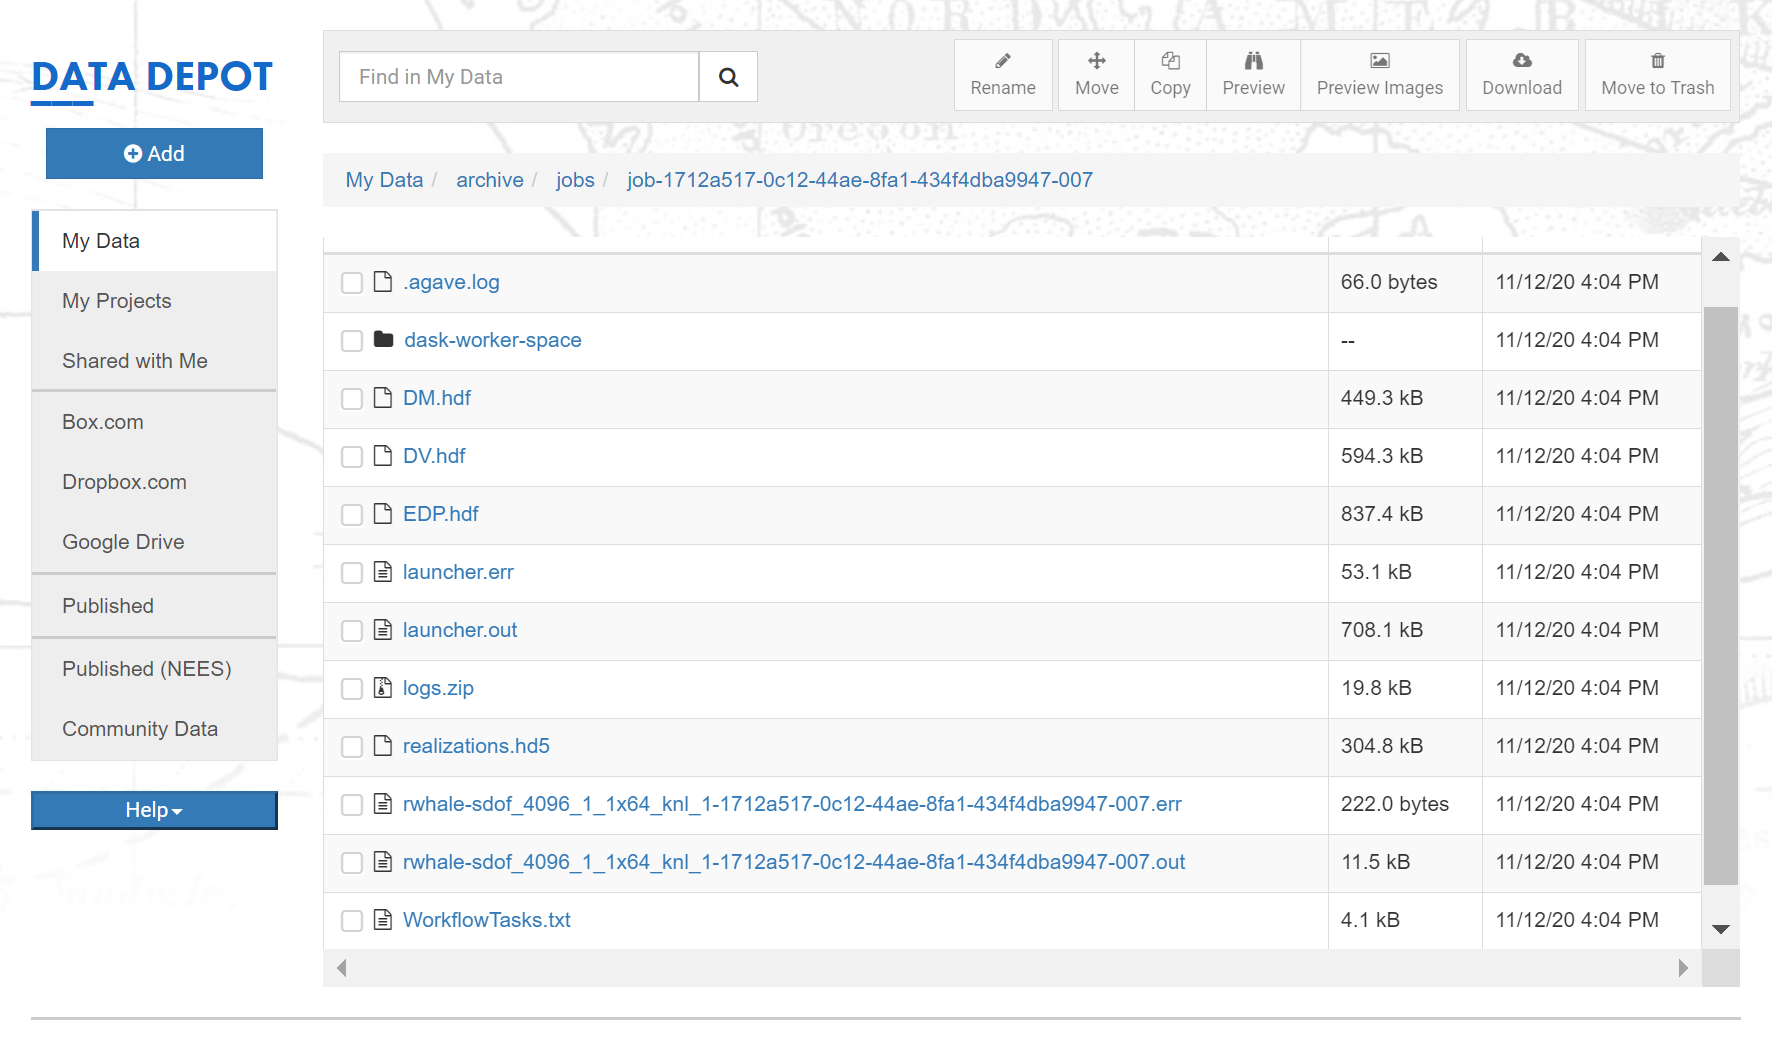
To access the job outputs, click on “More Info” for the job. You will be directed to the job archive folder in the Data Depot.
The aggregated outputs are saved in HDF files: “DM.hdf”, “DV.hdf”, and “EDP.hdf” contain the EDP and DL summary results for all built assets. “realizations.hd5” contains the response simulation results for each event simulated per built asset.
“launcher.err” contains error messages produced during the job run.
“launcher.out” contains the log file.
2.5.2.3. Submit Job Through Tapis
This method involves submitting the job using the Tapis CLI directly. If using Windows, execute this in the Ubuntu subsystem. Please refer to Chapter 9 of the Tapis How-To Guide for more details.
First, ensure that the Tapis CLI is installed on your computer. Open an Ubuntu window and install the Tapis CLI using
pip:pip install tapis-cli
Or, install the Tapis CLI from GitHub:
git clone https://github.com/TACC-Cloud/tapis-cli-ng.git
cd tapis-cli-ng/
pip install --upgrade --user .
Set up a Tapis session on each host where you will use the Tapis CLI. This is a one-time setup where you will be asked to agree to terms, select a tenant, and finally enter a username and password for that tenant. Execute the command:
tapis auth init
You will see an output in the Ubuntu window similar to the following:
Select “y” to the prompts.
Set
tenant_nameto “designsafe”.Set
usernameandpasswordto your TACC username and password.Keep
registry_urlashttps://index.docker.ioSet
git_usernameandgit_tokento your GitHub account details. See directions here for more information on generating a git token.
Use of Tapis requires acceptance of the TACC Acceptable Use Policy
which can be found at https://portal.tacc.utexas.edu/tacc-usage-policy
Do you agree to abide by this AUP? (type 'y' or 'n' then Return) y
Use of Tapis requires acceptance of the Tapis Project Code of Conduct
which can be found at https://tapis-project.org/code-conduct
Do you agree to abide by this CoC? (type 'y' or 'n' then Return) y
To improve our ability to support Tapis and the Tapis CLI, we would like to
collect your IP address, operating system, and Python version. No personally identifiable information will be collected. This data will only be shared in
aggregate form with funders and Tapis platform stakeholders.
Do you consent to this reporting? [Y/n]: Y

+---------------+--------------------------------------+----------------------------------------+
| Name          | Description                          | URL                                    |
+---------------+--------------------------------------+----------------------------------------+
| 3dem          | 3dem Tenant                          | https://api.3dem.org/                   |
| agave.prod    | Agave Public Tenant                  | https://public.agaveapi.co/             |
| araport.org   | Araport                              | https://api.araport.org/                |
| bridge        | Bridge                               | https://api.bridge.tacc.cloud/          |
| designsafe    | DesignSafe                           | https://agave.designsafe-ci.org/        |
| iplantc.org   | CyVerse Science APIs                 | https://agave.iplantc.org/              |
| irec          | iReceptor                            | https://irec.tenants.prod.tacc.cloud/   |
| portals       | Portals Tenant                       | https://portals-api.tacc.utexas.edu/    |
| sd2e          | SD2E Tenant                          | https://api.sd2e.org/                   |
| sgci          | Science Gateways Community Institute | https://sgci.tacc.cloud/                |
| tacc.prod     | TACC                                 | https://api.tacc.utexas.edu/            |
| vdjserver.org | VDJ Server                           | https://vdj-agave-api.tacc.utexas.edu/  |
+---------------+--------------------------------------+----------------------------------------+

Enter a tenant name [tacc.prod]:
tacc.prod username: taccuser
tacc.prod password for taccuser:
Initialize a job with the name “R2D_test_run” by executing the command:
tapis jobs init rWhale-2.1.0 --name R2D_test_run > job.jsonA job.json file is created. You may make changes to this file using the VIM Editor, by executing the command:
vim job.jsonEdit the job.json file to specify settings for running the job on Frontera. To make edits in the VIM Editor, press
i. To exit out of the editor, type:wq.Once the job.json file is prepared, submit the job by executing the command:
tapis jobs submit -F job.json
An ACCEPTED status indicates that the job.json was valid, and e-mail alerts (if they were specified in job.json) will track the progress of the job. Also, take note of the long hexadecimal ID (job ID) when you submit the job. This identifier can be used to track progress and download results.
To check the status of a specific job, execute the command below, replacing <job ID> with the ID of the job:
tapis jobs status <job ID>After the job is completed, you can download the results. They are available either in the job archives (which can be accessed from the Workspace on DesignSafe) or directly from Tapis. Use the following command to download:
tapis jobs outputs download --progress <job ID>
To download a specific file from the outputs, use:
tapis jobs outputs download <job ID> <file name>