3.1.5.1. Configuring CustomUQ Engine
In order to use the CustomUQ engine option, the following two tasks need to be performed:
Configure the UQ tab to accept the required inputs
Add UQ engine to customized UQ backend
These two steps are explained in more detail next.
Configuring UQ tab
The quoFEM interface can be customized to accept the required inputs for user-specified UQ engines. The “CustomUQ” option should be selected, as shown in Fig. 3.1.5.1.1. This will direct quoFEM to invoke the customized UQ backend where users can plug in their own functionality.

Fig. 3.1.5.1.1 CustomUQ engine selection.
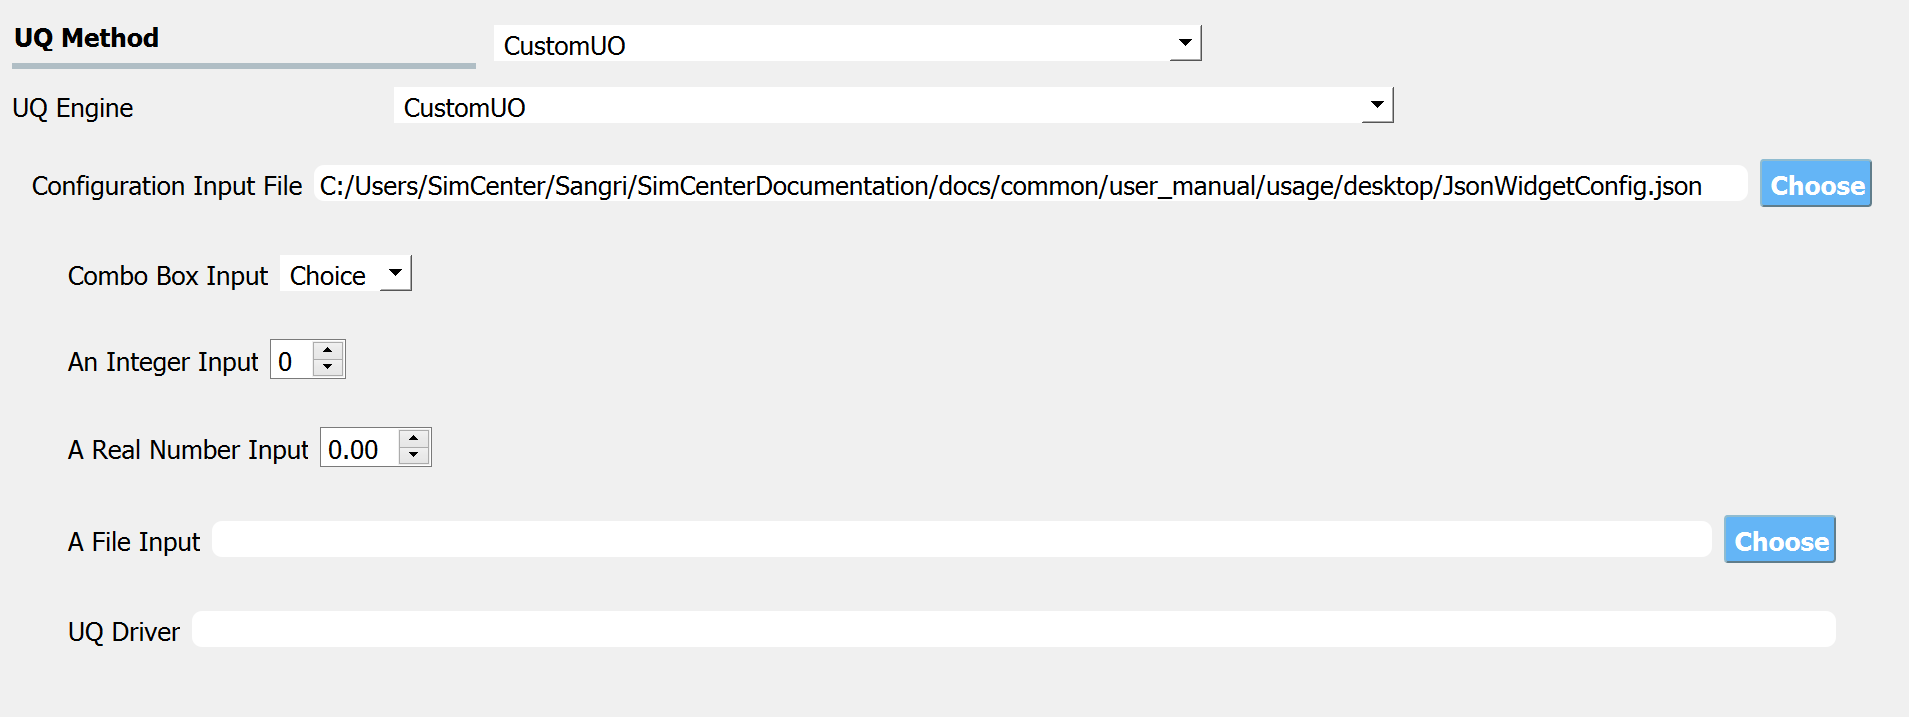
Next, users must configure the interface to accept inputs required to run their UQ engine. This is done through a JSON configuration file that is specified through the “Configuration Input File”. Once this file is input, the user interface will be automatically updated to accept the inputs specified in the JSON configuration. An example JSON configuration is shown below. This configuration file generates the interface shown in Fig. 3.1.5.1.2.
{
	"Parameters" :  [
		{
		    "type" : "ComboBox",
		    "name" : "Combo Box Input",
		    "values" : ["Choice 1", "Choice 2", "Choice 3"]
		},
		{
		    "type" : "SpinBox",
		    "name" : "An Integer Input"
		},
		{
		    "type" : "DoubleSpinBox",
		    "name" : "A Real Number Input"
		},
		{
		    "type" : "FileInput",
		    "name" : "A File Input"
		},
		{
		    "type" : "LineEdit",
		    "name" : "UQ Driver"
		}
	]
}

Fig. 3.1.5.1.2 Custom UQ Engine Configuration
Users can currently specify the following types of inputs:
ComboBox: Allows selection of a particular option from a specified set
Spin Box: Used to input integer values
Double Spin Box: Used to input floating point numbers
File Input: Used for inputting file locations
Line Edit: Used to input text values
Lastly, users must specify the UQ driver name. This is required to direct the customized UQ backend to the correct UQ driver. The driver’s name must correspond to the name provided by the customized backend, as described below.
Adding UQ Engine to Customized Backend
In addition to configuring the user interface to accept the required inputs, it is necessary to make the custom UQ engine accessible to the customized UQ backend in quoFEM. This is achieved by providing a UQ runner class in Python that follows the defined interface. Users must create a UQ runner class that inherits from the UqRunner class, which is shown below
# written: Michael Gardner @ UNR

# DO NOT CHANGE THE FACTORY, JUST IMPORT IT INTO ADDITIONAL DERIVED CLASSES
# Polymorhophic factory for running UQ apps
class UqRunnerFactory:
    factories = {}
    def addFactory(id, runnerFactory):
        UqRunnerFactory.factories.put[id] = runnerFactory
    addFactory = staticmethod(addFactory)
    # A Template Method:
    def createRunner(id):
        if id not in UqRunnerFactory.factories:
            UqRunnerFactory.factories[id] = \
              eval(id + '.Factory()')
        return UqRunnerFactory.factories[id].create()

    createRunner = staticmethod(createRunner)

# Abstract base class
class UqRunner(object):
    def runUQ(self, uqData, simulationData, randomVarsData, demandParams,
              workingDir, runType, localAppDir, remoteAppDir):
        """
        This function configures and runs a UQ simulation based on the
        input UQ configuration, simulation configuration, random variables,
        and requested demand parameters

        Input:
        uqData:         JsonObject that UQ options as input into the quoFEM GUI
        simulationData: JsonObject that contains information on the analysis package to run and its
                    configuration as input in the quoFEM GUI
        randomVarsData: JsonObject that specifies the input random variables, their distributions,
                    and associated parameters as input in the quoFEM GUI
        demandParams:   JsonObject that specifies the demand parameters as input in the quoFEM GUI
        workingDir:     Directory in which to run simulations and store temporary results
        runType:        Specifies whether computations are being run locally or on an HPC cluster
        localAppDir:    Directory containing apps for local run
        remoteAppDir:   Directory containing apps for remote run
        """
        pass

    # Factory for creating UQ runner
    class Factory:
        def create(self):
            pass
This runner class only needs to provide a runUQ method and a factory class that creates an instance of this class. The runUQ method is where the customized inputs from the user interface can be accessed and passed to the custom UQ driver.
As an example, UQpy has been implemented in the customized backend–the source code for the customized UqRunner class can be found in the SimCenterBackendApplications repository, linked here, and is also available in the {Path to quoFEM app contents}/applications/performUQ/other directory.
Note
The parameters generated by the UQ engine must be stored in a file named
params.in and placed in the current working directory. The file must
follow the format shown in the example params.in file shown below. The first line specifies the number of random variables while
the subsequent lines first contain the name of the random variable and the
value of the current realization separated by a space.
2
randomVariable 2.719191180014362e+02
anotherRandomVariable 7.518852020241320e+01
Lastly, the name of the UQ driver needs to be added to configureAndRunUQ.py in the list of UQ driver options–this corresponds to the UQ driver name provided by the customized user interface.
The configureAndRunUQ.py file is as shown here, and is located in the {Path to quoFEM app contents}/applications/performUQ/other directory.
With the derived UQ runner class and the name of the UQ driver added to the list of UQ driver options, the custom UQ engine has been plugged into the quoFEM backend and can now be invoked from the quoFEM user interface.