4.14. E17 - Earthquake Recovery using Pyrecodes
This earthquake example demonstrates utilizing the pyrecodes software to perform regional recovery simulations on a region damaged by an earthquake. The example first performs an assement of damage to the buildings, and lifelines infrastructure related to water and transportation. Following the computation of the damage, pyrecodes will then perform a recovery simulation for a number of the realizations of the predicted damage. pyrecodes uses an agent based approach, updating state at each time step of the recovery.
In this example, at each of these time steps, pyrecodes will be invoking ReWet for the determination of the water supply and the residual demand model for transportation.
This example builds upon material presented in Example 14 and Example 15. The area of interest is Alameda Island, CA. The input for the event is an IM field for a Mw7.05 event on the Hayward fault which was obtained from Probabilistic Seismic Hazard Analysis (PSHA) with the liquefaction-induced ground failure intensity measures (Permanent Ground Deformation) are calculated as described in Example 14. Damage to the Housing and both Water and Transportation components is determined using a HAZUS earthquake damage and loss methodology.
On completion of the damage assement pyrecodes is then invoked. pyrecodes is an open-source Python library developed at ETH Zurich for simulating regional recovery and assessing disaster resilience in the built environment. It provides an object-oriented implementation of the iRe-CoDeS framework, which models the post-disaster recovery process by discretizing the built environment into various interdependent components, in this case residential buildings, transportation components (bridges, tunnels, roadways) and water systems (pipes, junctions, pumps). The library then simulates changes in functionality over time, roadways, tunnels, bridges, water pipes, pumps iaccounting for resource flows like water, and local inhabitant and construction labor, to evaluate a community’s resilience and its ability to meet recovery goals. In this example, pyrecodes will incorporate the Residual Demand Model, that was utilized in Example 14, to determine transportation supply and water system supply using ReWet, as was utilized in Example 15.
The material presented for this example is focused on the inputs to pyrecodes and the results. Inputs for the Hazard, Assets, etc. as is shown and discussed in the other examples discussed and as such the reader is directed to those examples for understanding of inputs required. In this example we will be outlining the inputs in the REC panel to run pyrecodes.
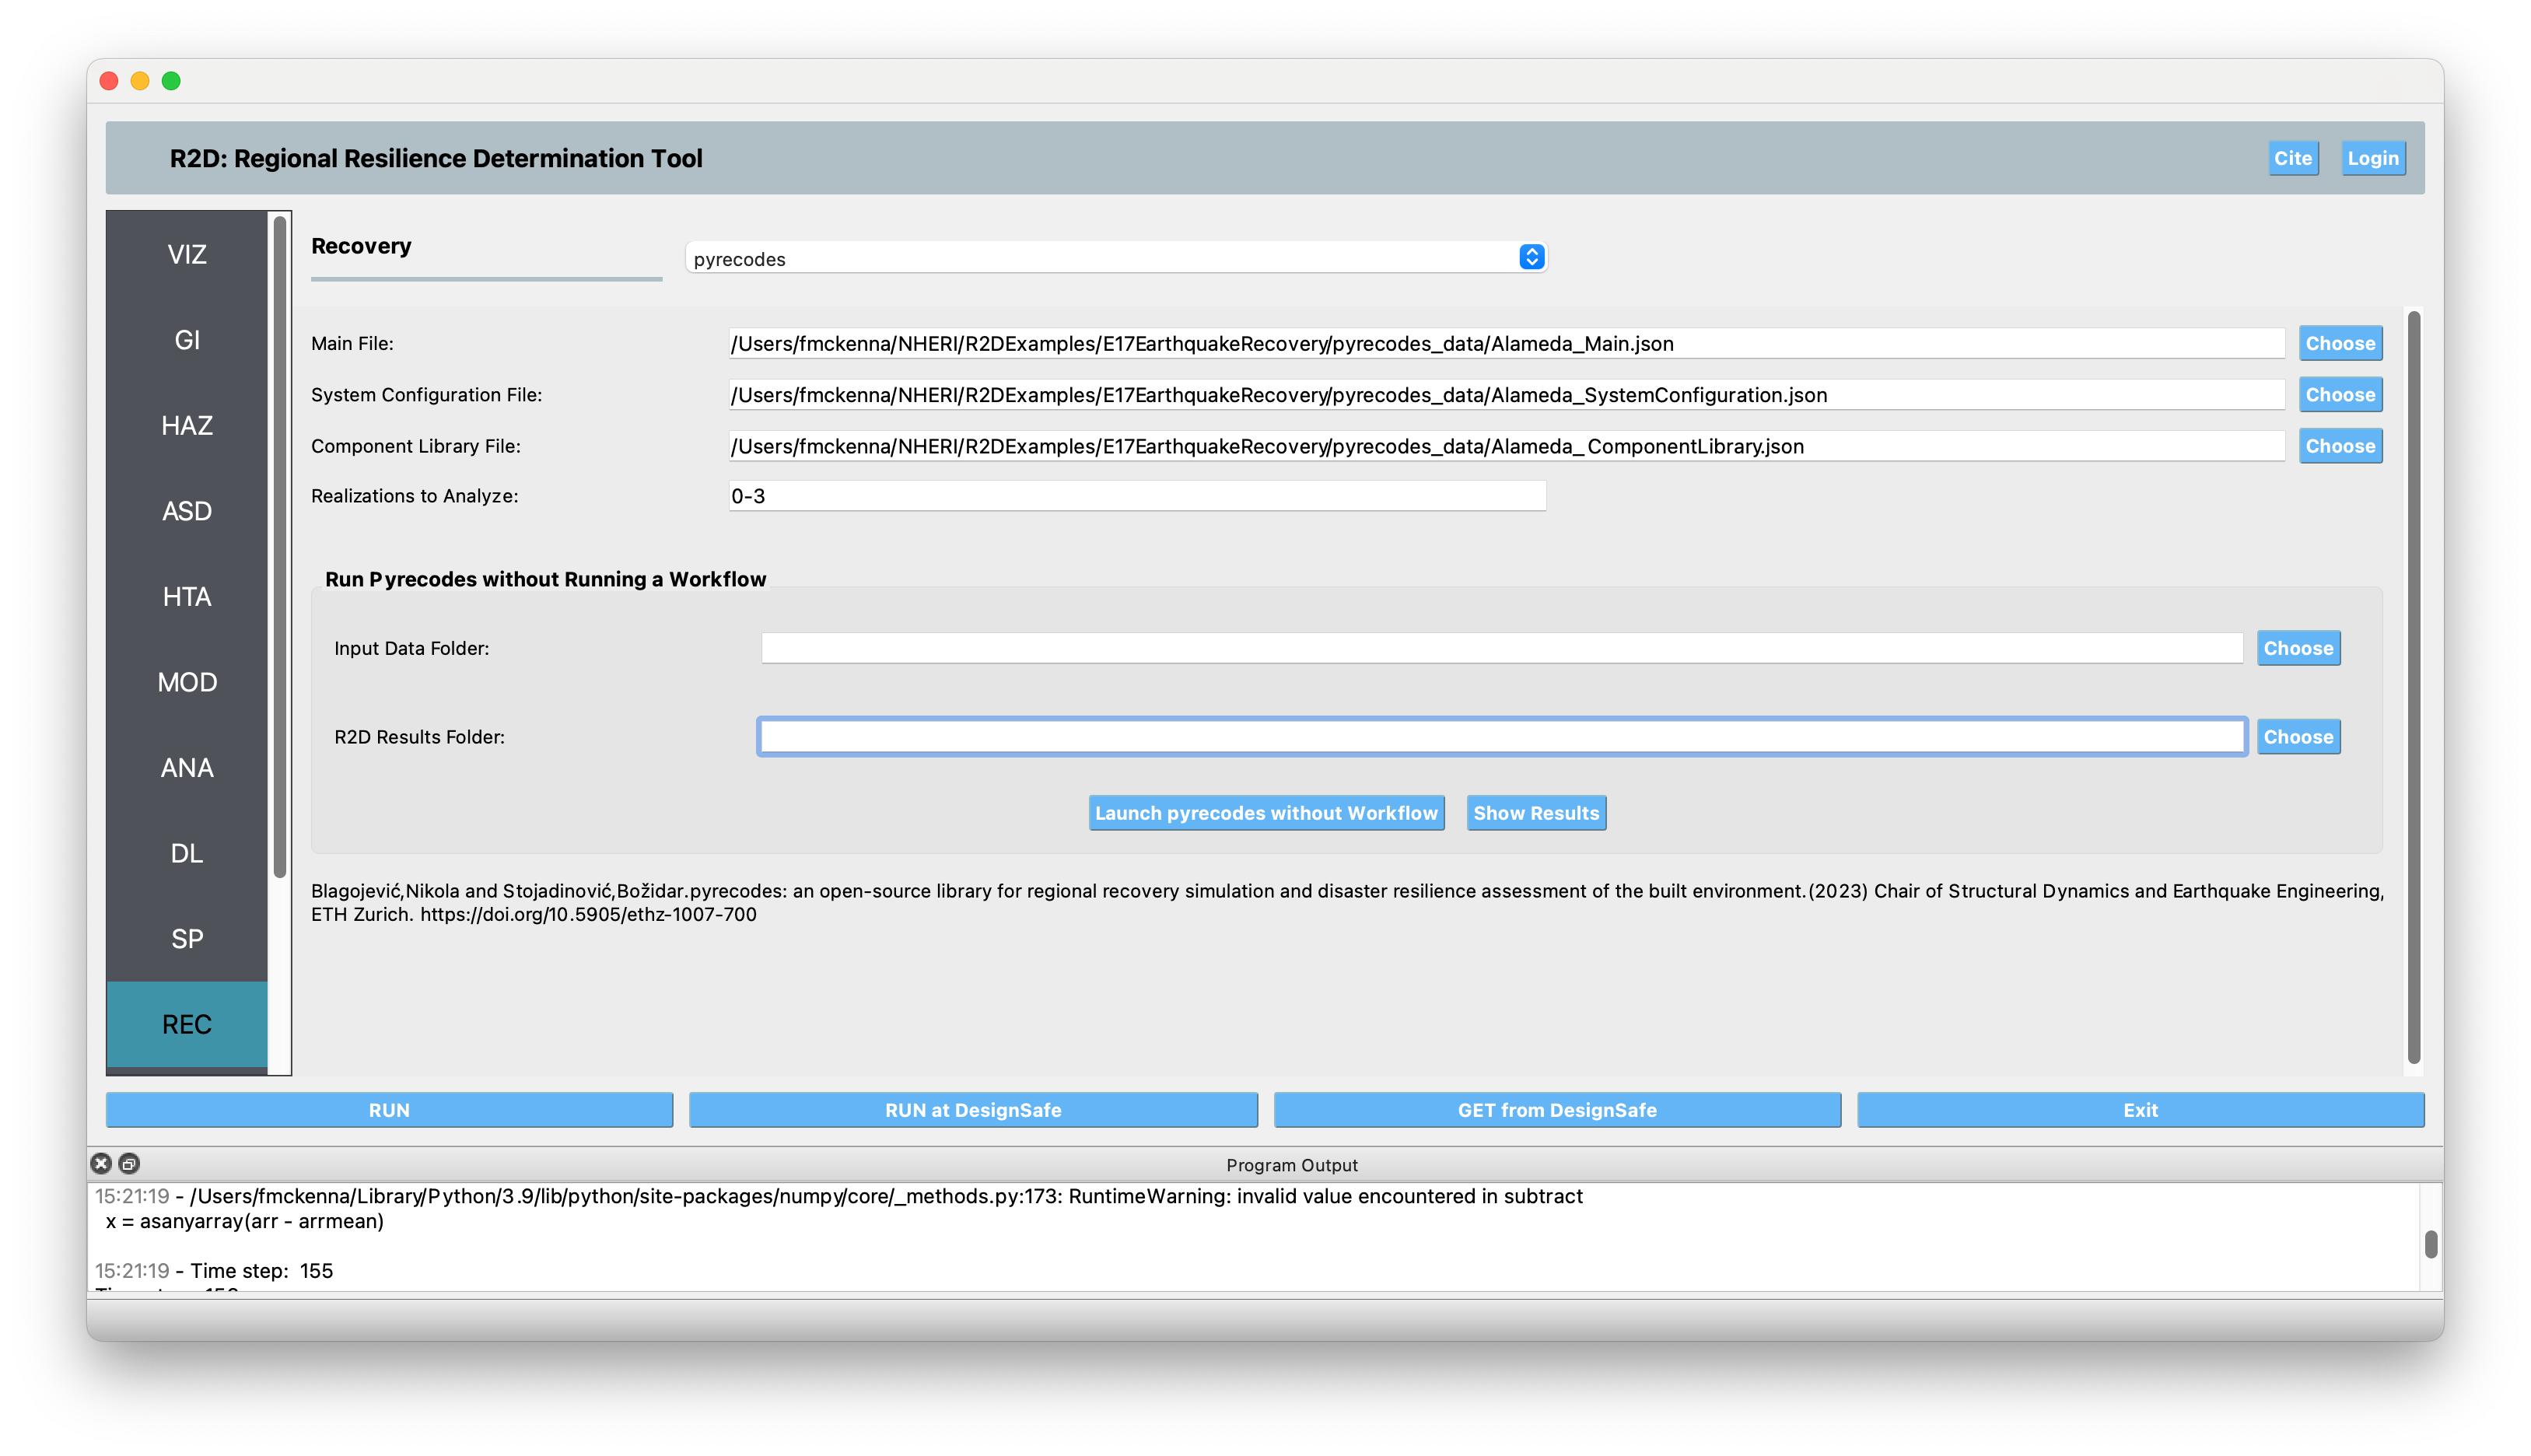
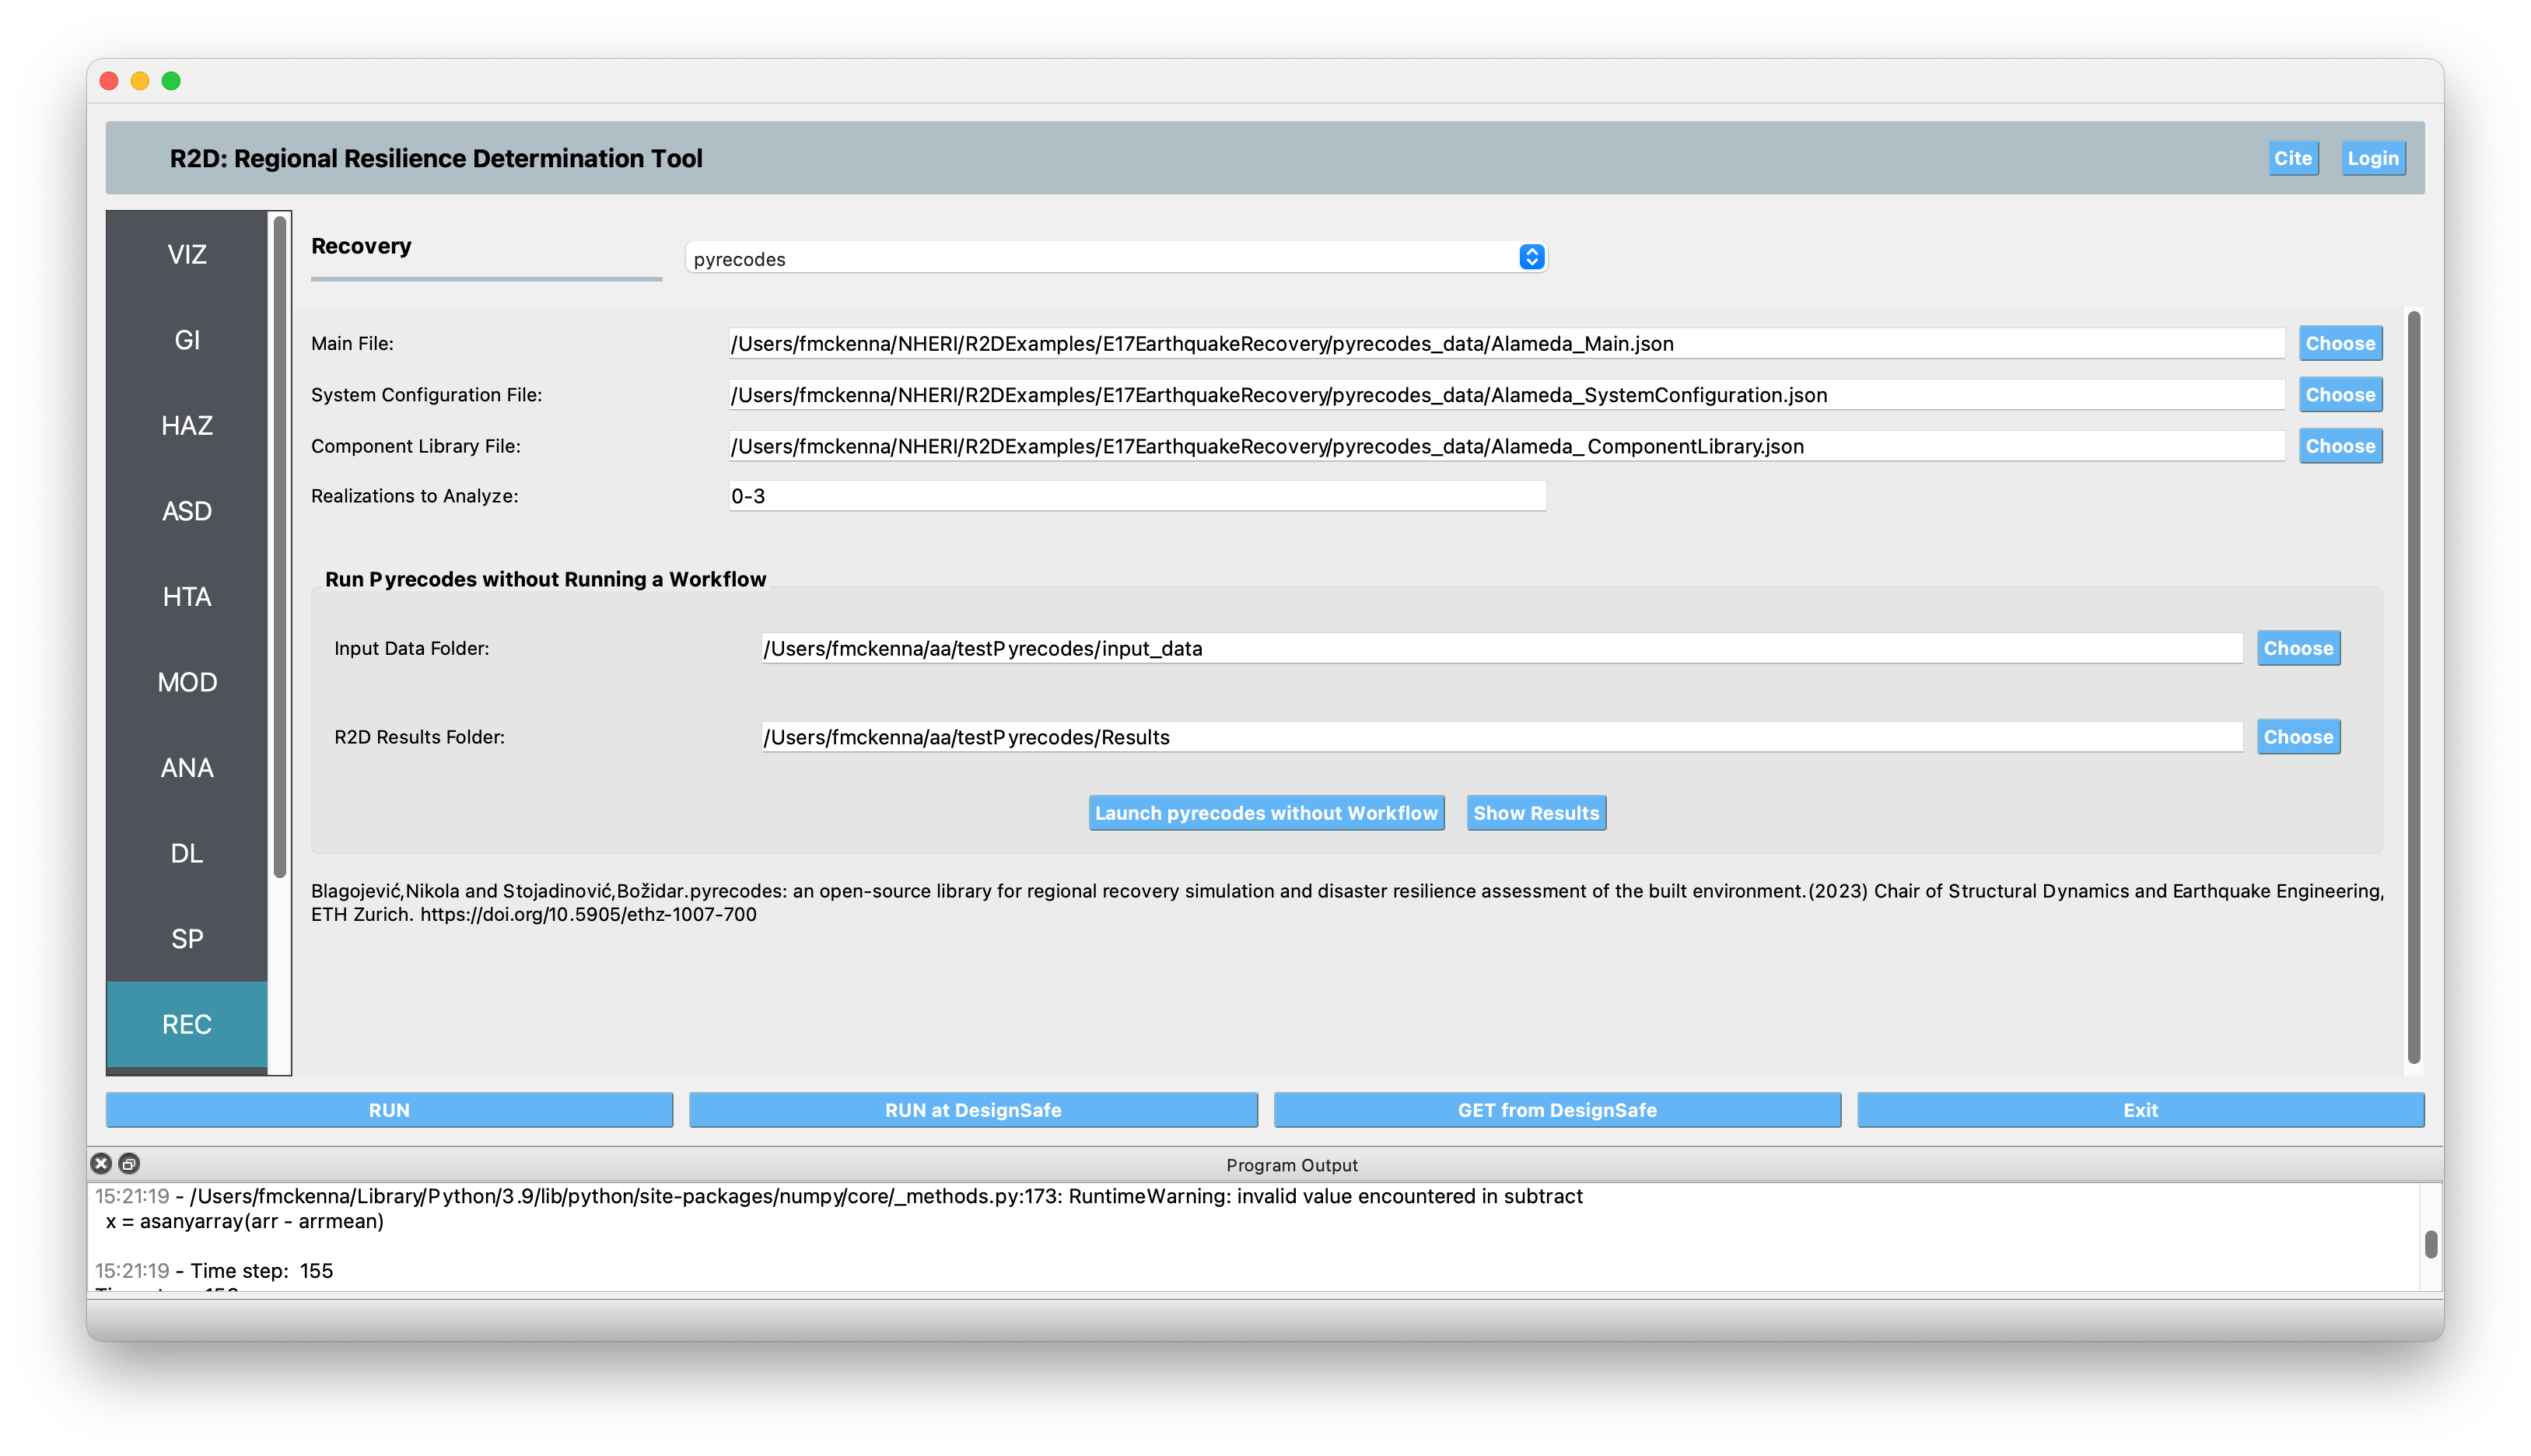
REC The visualization panel in the following figure shows the inputs for pyrecodes, which for running in the Workflow is 4 items. The name of an input file which will be used to run pyrecodes, two pyrecodes files the system configuration and the component library file. For R2D a fourth input specifies the realizations of the damage workflow to run pyrecodes on.
Note
Pyrecodes can be run as part of the workflow or, if the user has run the workflow, as a seperate process which will just run the pyrecodes software and display the results fro pyrecoedes. To run the latter option, the user enters two additional entries. The first is the location of the input_data folder which was used when the workflow ran and the second is the directory containing the resulults folder of R2D and the workflow. (This directory, if run locally, is $HOME/Documents/R2D/LocalWorkDir/tmp.SimCenter/Results.) After the user has provided these inputs, they press the button Launch pyrecodes Without Workflow to launch the running of pyrecodes.
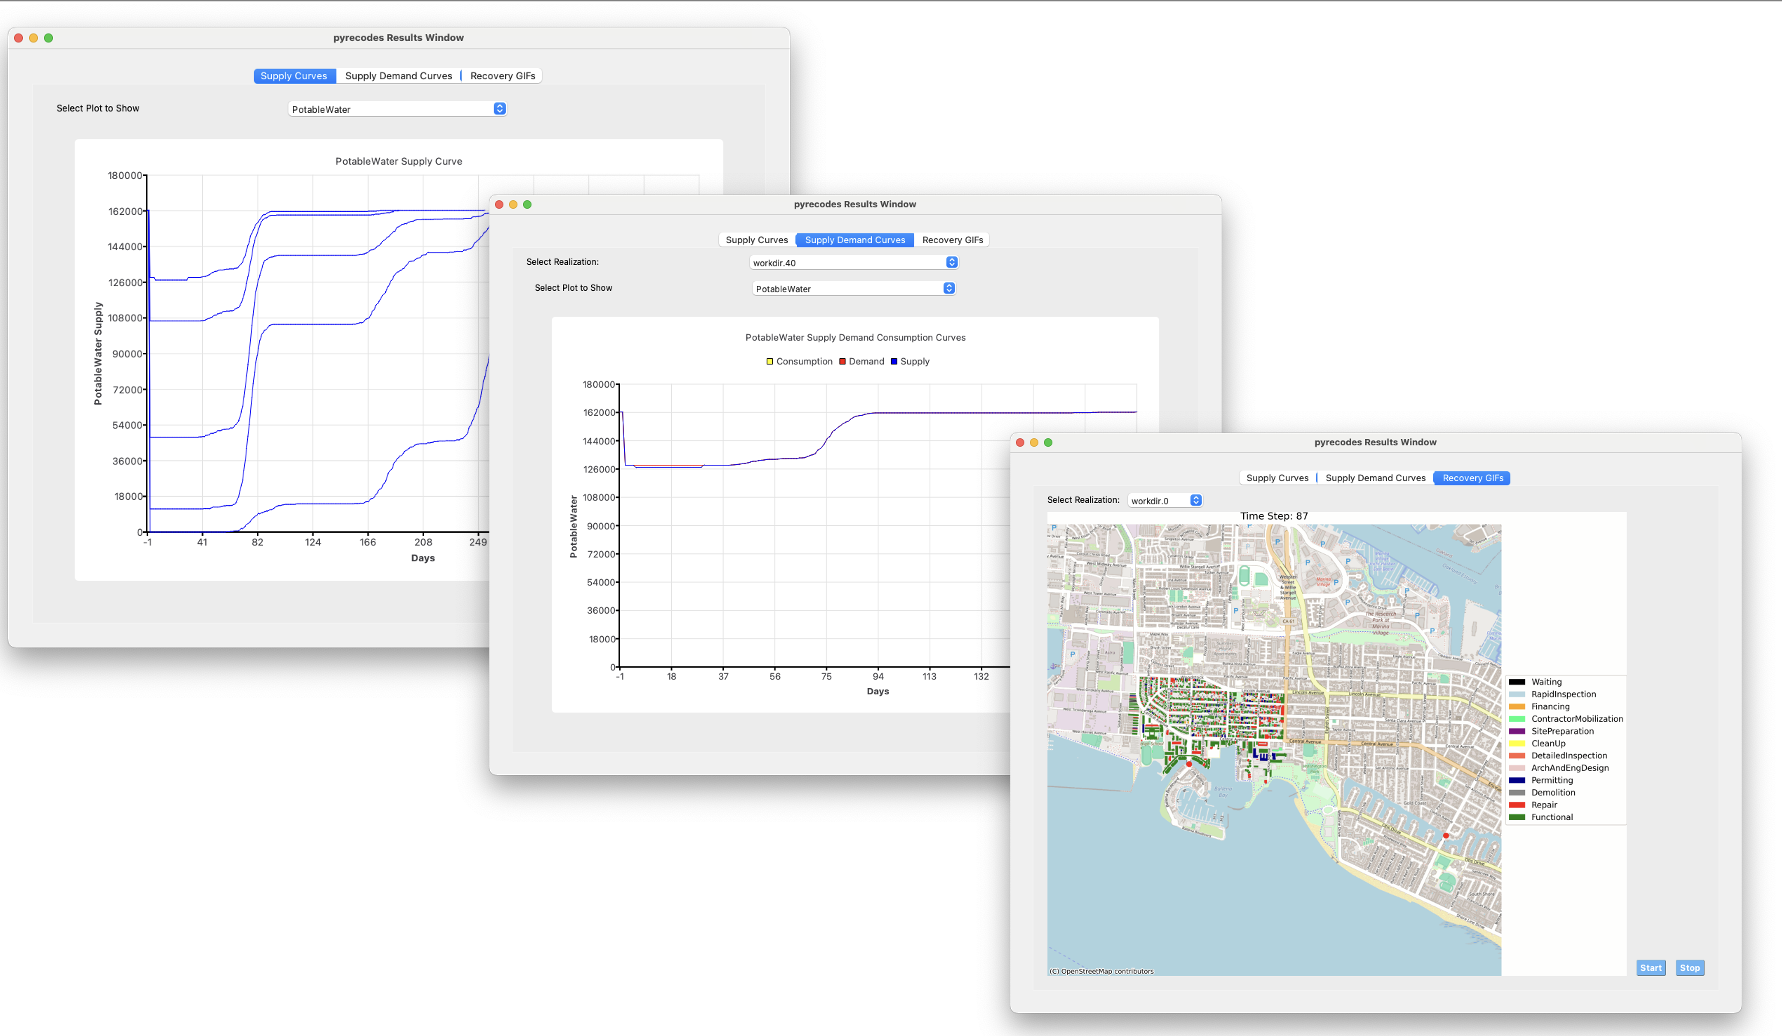
RES Once the workflow has run with pyrecodes, in the results window that is displayed, there will be a tab for ‘Recovery’. Selecting this tab will bring up the window swhown below. It is a window containg 3 tabs. The first, and the one displayed when this window appears, is a figure showing the supply curves for the different realizations. By selecting from the plots to show dropdown, the user can chhose to look at housing or water supply. When the user hovers over the points on any line in the plot, it will bring up information about the points on the lines, including the workdir info. The workdir info corresponds to the realizations the user selected, i.e. workdir2 corrsponds to results for realization 2. The second tabbed widget is labeled ‘Supply Demand’, and shows the supply-demand-consumption curves for an individual realization. The user selects the realization to view from the dropdown menu at the top of the plot. The last tab, labeled ‘Recovery Gifs’, provides the user with a video of how the recovery proceeds for each individual realization. The user selects the start and stop button to play and stop the movie respectivily.
Pyrecodes Inputs In this section we will quickly go over the input file generated by R2D (or the user if the have one) and the changes to the system configuration file to sepcify using the Residual Demand model and ReWet. For other options and how to specify the inputs in the files, the user is directed to the pyrecioodes manual.
The first file, in this case Alameda_Main.json, specifies the Component Library and System information needed by pyrecodes. In addition the “DamageInput” section outlines the realizations to run, in this case 0,1,2 and 40 of the workdlow when it runs.
{
   "ComponentLibrary": {
      "ComponentLibraryCreatorFileName": "json_component_library_creator",
      "ComponentLibraryCreatorClassName": "JSONComponentLibraryCreator",
      "ComponentLibraryFile": "Alameda_ComponentLibrary.json"
   },
   "System": {
      "SystemCreatorClassName": "ConcreteSystemCreator",
      "SystemCreatorFileName": "concrete_system_creator",
      "SystemClassName": "BuiltEnvironment",
      "SystemFileName": "built_environment",
      "SystemConfigurationFile": "Alameda_SystemConfiguration.json"
   },
   "DamageInput": {
      "Type": "SpecificRealization",
      "Parameters":{
        "Filter": "0-2,40"
      }
   }
}
Specifying the use of Rewet and the Residual demand model is done in the system configuration file, in this case AlamedaySystemConfiguation.json. For each locaility where information on the system ro be used to peform the work for pyrecodes is presented, the user has entered the following for the infrastructure.
"Infrastructure": [
      {
          "TransportationSystem": {
              "CreatorClassName": "R2DSubsystemCreator",
              "CreatorFileName": "r2d_subsystem_creator",
              "Parameters": {
                  "Resource": [
                      "TransportationService"
                  ],
                  "R2DJSONFile_Info": "./Example 5/Alameda_Exposure.json",
                  "SubsystemNameInR2DJSON": "TransportationNetwork",
                  "AssetTypes": [
                      "Bridge",
                      "Roadway",
                      "Tunnel"
                  ]
              }
          }
      },
      {
          "WaterSupplySystem": {
              "CreatorClassName": "R2DSubsystemCreator",
              "CreatorFileName": "r2d_subsystem_creator",
              "Parameters": {
                  "Resource": [
                      "Water"
                  ],
                  "R2DJSONFile_Info": "./Example 5/Alameda_Exposure.json",
                  "SubsystemNameInR2DJSON": "WaterDistributionNetwork",
                  "AssetTypes": [
                      "Pipe"
                  ],
                  "MaxNumComponents": 10000
              }
          }
      }
  ]